Table of Contents 80-GRAFIX SOFTWARE PACKAGE Description.......................................1 80-GRAFIX DOCUMENTATION Welcome...........................................2 1.0 INSTALLATION.................................3 1.1 TROUBLE SHOOTING YOUR INSTALLATION...........7 2.0 THEORY OF OPERATION..........................9 3.0 USING THE 80-GRAFIX.........................11 3.1 MODE CONTROL................................11 3.2 CHARACTER RAM PROGRAMMING...................12 Program #1...............................14 Program #2...............................14 3.3 ASSEMBLY LANGUAGE TECHNIQUES................17 Recommended Reading......................18 Keyboard Driver for 80-GRAFIX............19 3.4 PROGRAMMING MOVING GRAPHICS.................21 3.5 OTHER PROGRAMMING IDEAS.....................22 3.6 SOME PARTING THOUGHTS.......................24 List of Illustrations Fig. 1 OVERALL PICTURE - Installation Fig. 2 INSET - Solder Connection Step 7 Fig. 3 INSET - Solder Connection Step 10
80-GRAFIX SOFTWARE PACKAGE Side 1 BASIC programs: use "CLOAD" 1. DEMO 2. CREATE 3. LOCASE/BAS 4. TIE FIGHTER Side 2 1. LOCASE -- SYSTEM
80-GRAFIX DOCUMENTATION Welcome to the exciting world of 80-GRAFIX! Your TRS-80 (tm) will be transformed into a powerful new system, with graphics capabilities far beyond your dreams after you have installed your 80-GRAFIX board -- and new worlds of programming adventure await your dancing fingers! In the following pages we will explore the various techniques which may be employed in proqramming the new high resolution graphics in your computer - and examine some of the theories of operation that apply to the 80-GRAFIX board. Later, you will see some actual programming examples that you may employ in your own works, including a few approaches in Level II (and Disk) Basic, as well as some assembly source listings for the more adventuresome. The 80-GRAFIX (tm) project is so new and radically different from anything previously available for the TRS-80 (tm), that we have only scratched the surface of its possibilities - and we await your discoveries, as a pioneer in the field! Ralph Burris for PROGRAMMA INTERNATIONAL July, 1980 - 2 -
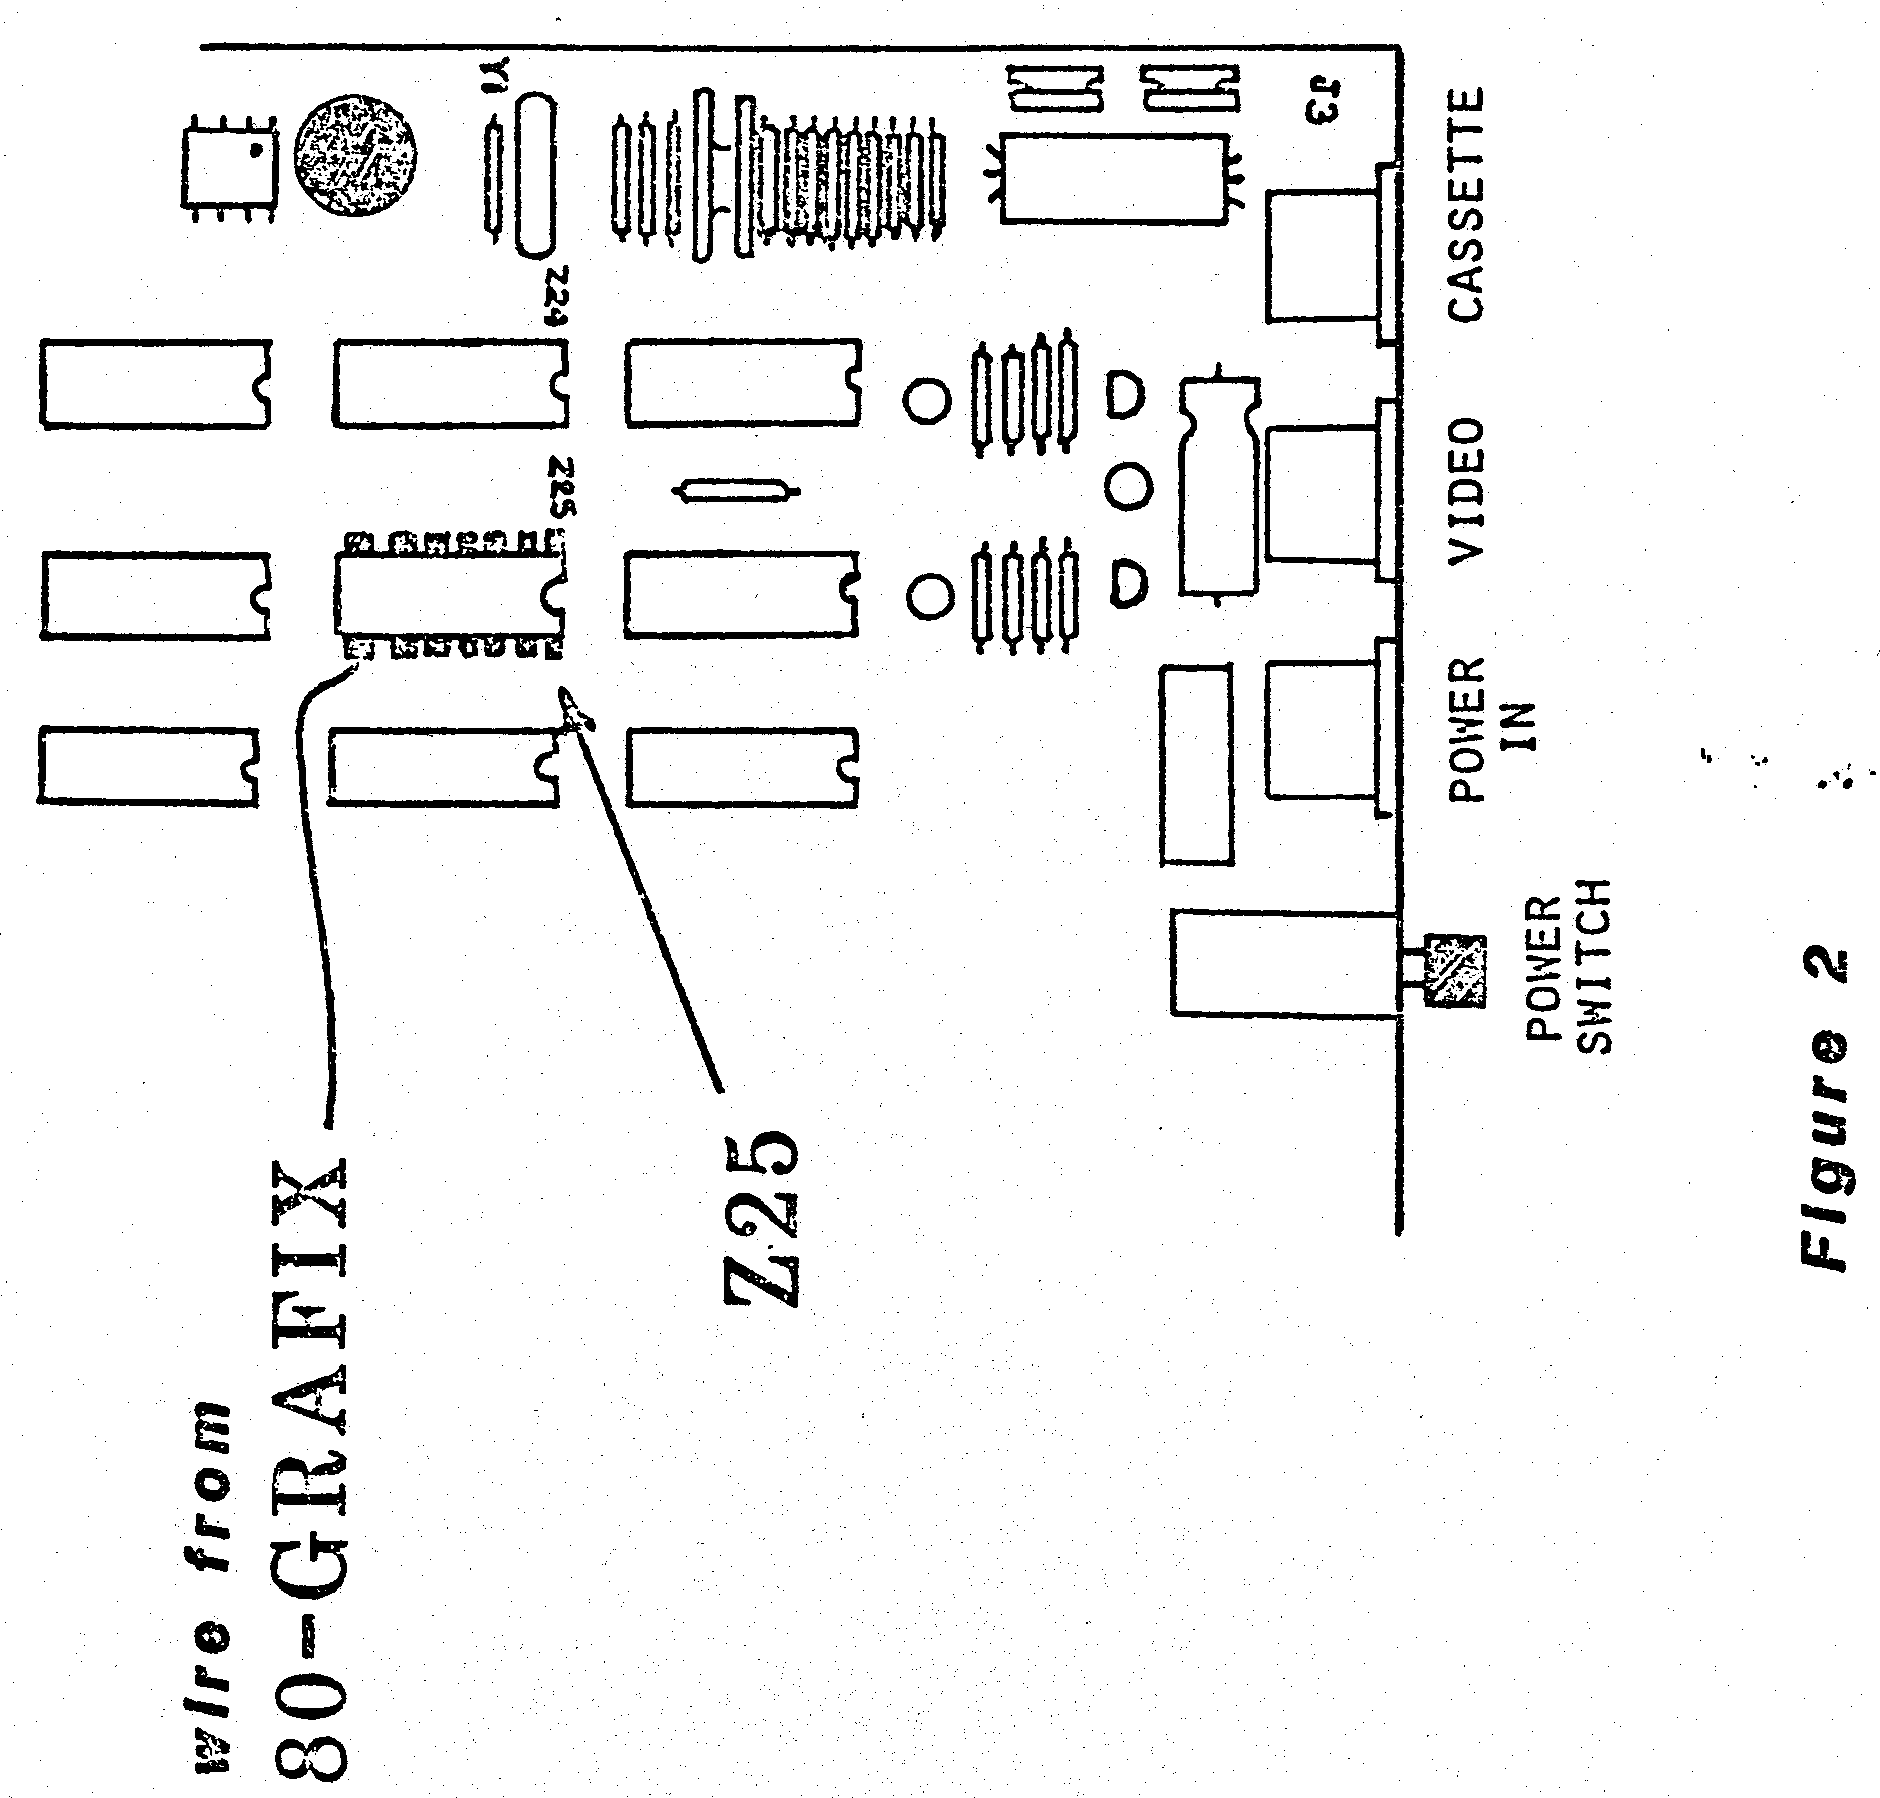
80-GRAFIX INSTALLATION July 1980 INSTALLATION BEFORE YOU GRAB YOUR SCREWDRIVER... As you know, if you haven't opened your keyboard before, doing so will void your limited 90-day warranty, and may make your Repair Center a little upset if anything goes wrong - so you would be wise to assess your soldering skills before you proceed. If you don't feel up to the task of making two solder connections, consider getting help from someone with experience, or having an electronics technician or repair shop do the job for you. Willing to try? Here we go... First, clear a working space about the size of a card table. (It is wise to use a soft, non-static surface to avoid scratching the plastic covers and keyboard.) Next, assemble the following tools: 1 Phillips head screwdriver 1 pair of small wire cutters/dykes 1 pair of small needle-nosed pliers 1 15 watt, 3/32" tip soldering iron 1 tube of Duco or similar cement (optional) 1 magnifying glass Remove all plugs, place the keyboard unit on the working surface, and follow these steps: 1. Turn the keyboard upside down - locate and remove the six (6) screws on the bottom. (One of them is tricky - it comes up through the grill, and may be covered with by a sticker or the warranty goop.) 2. CAREFULLY turn the keyboard back upright, and remove the top cover. 3. Lift the keyboard circuit card and let it hinge toward you. BE CAREFUL not to twist or break the connector cable at the lower left. Remove the five white spacers under the keyboard (and note where they were inserted). 4. Remove the entire printed circuit board assembly and keyboard from the bottom case, and place the PC board component side up with the keyboard above it. - 3 -
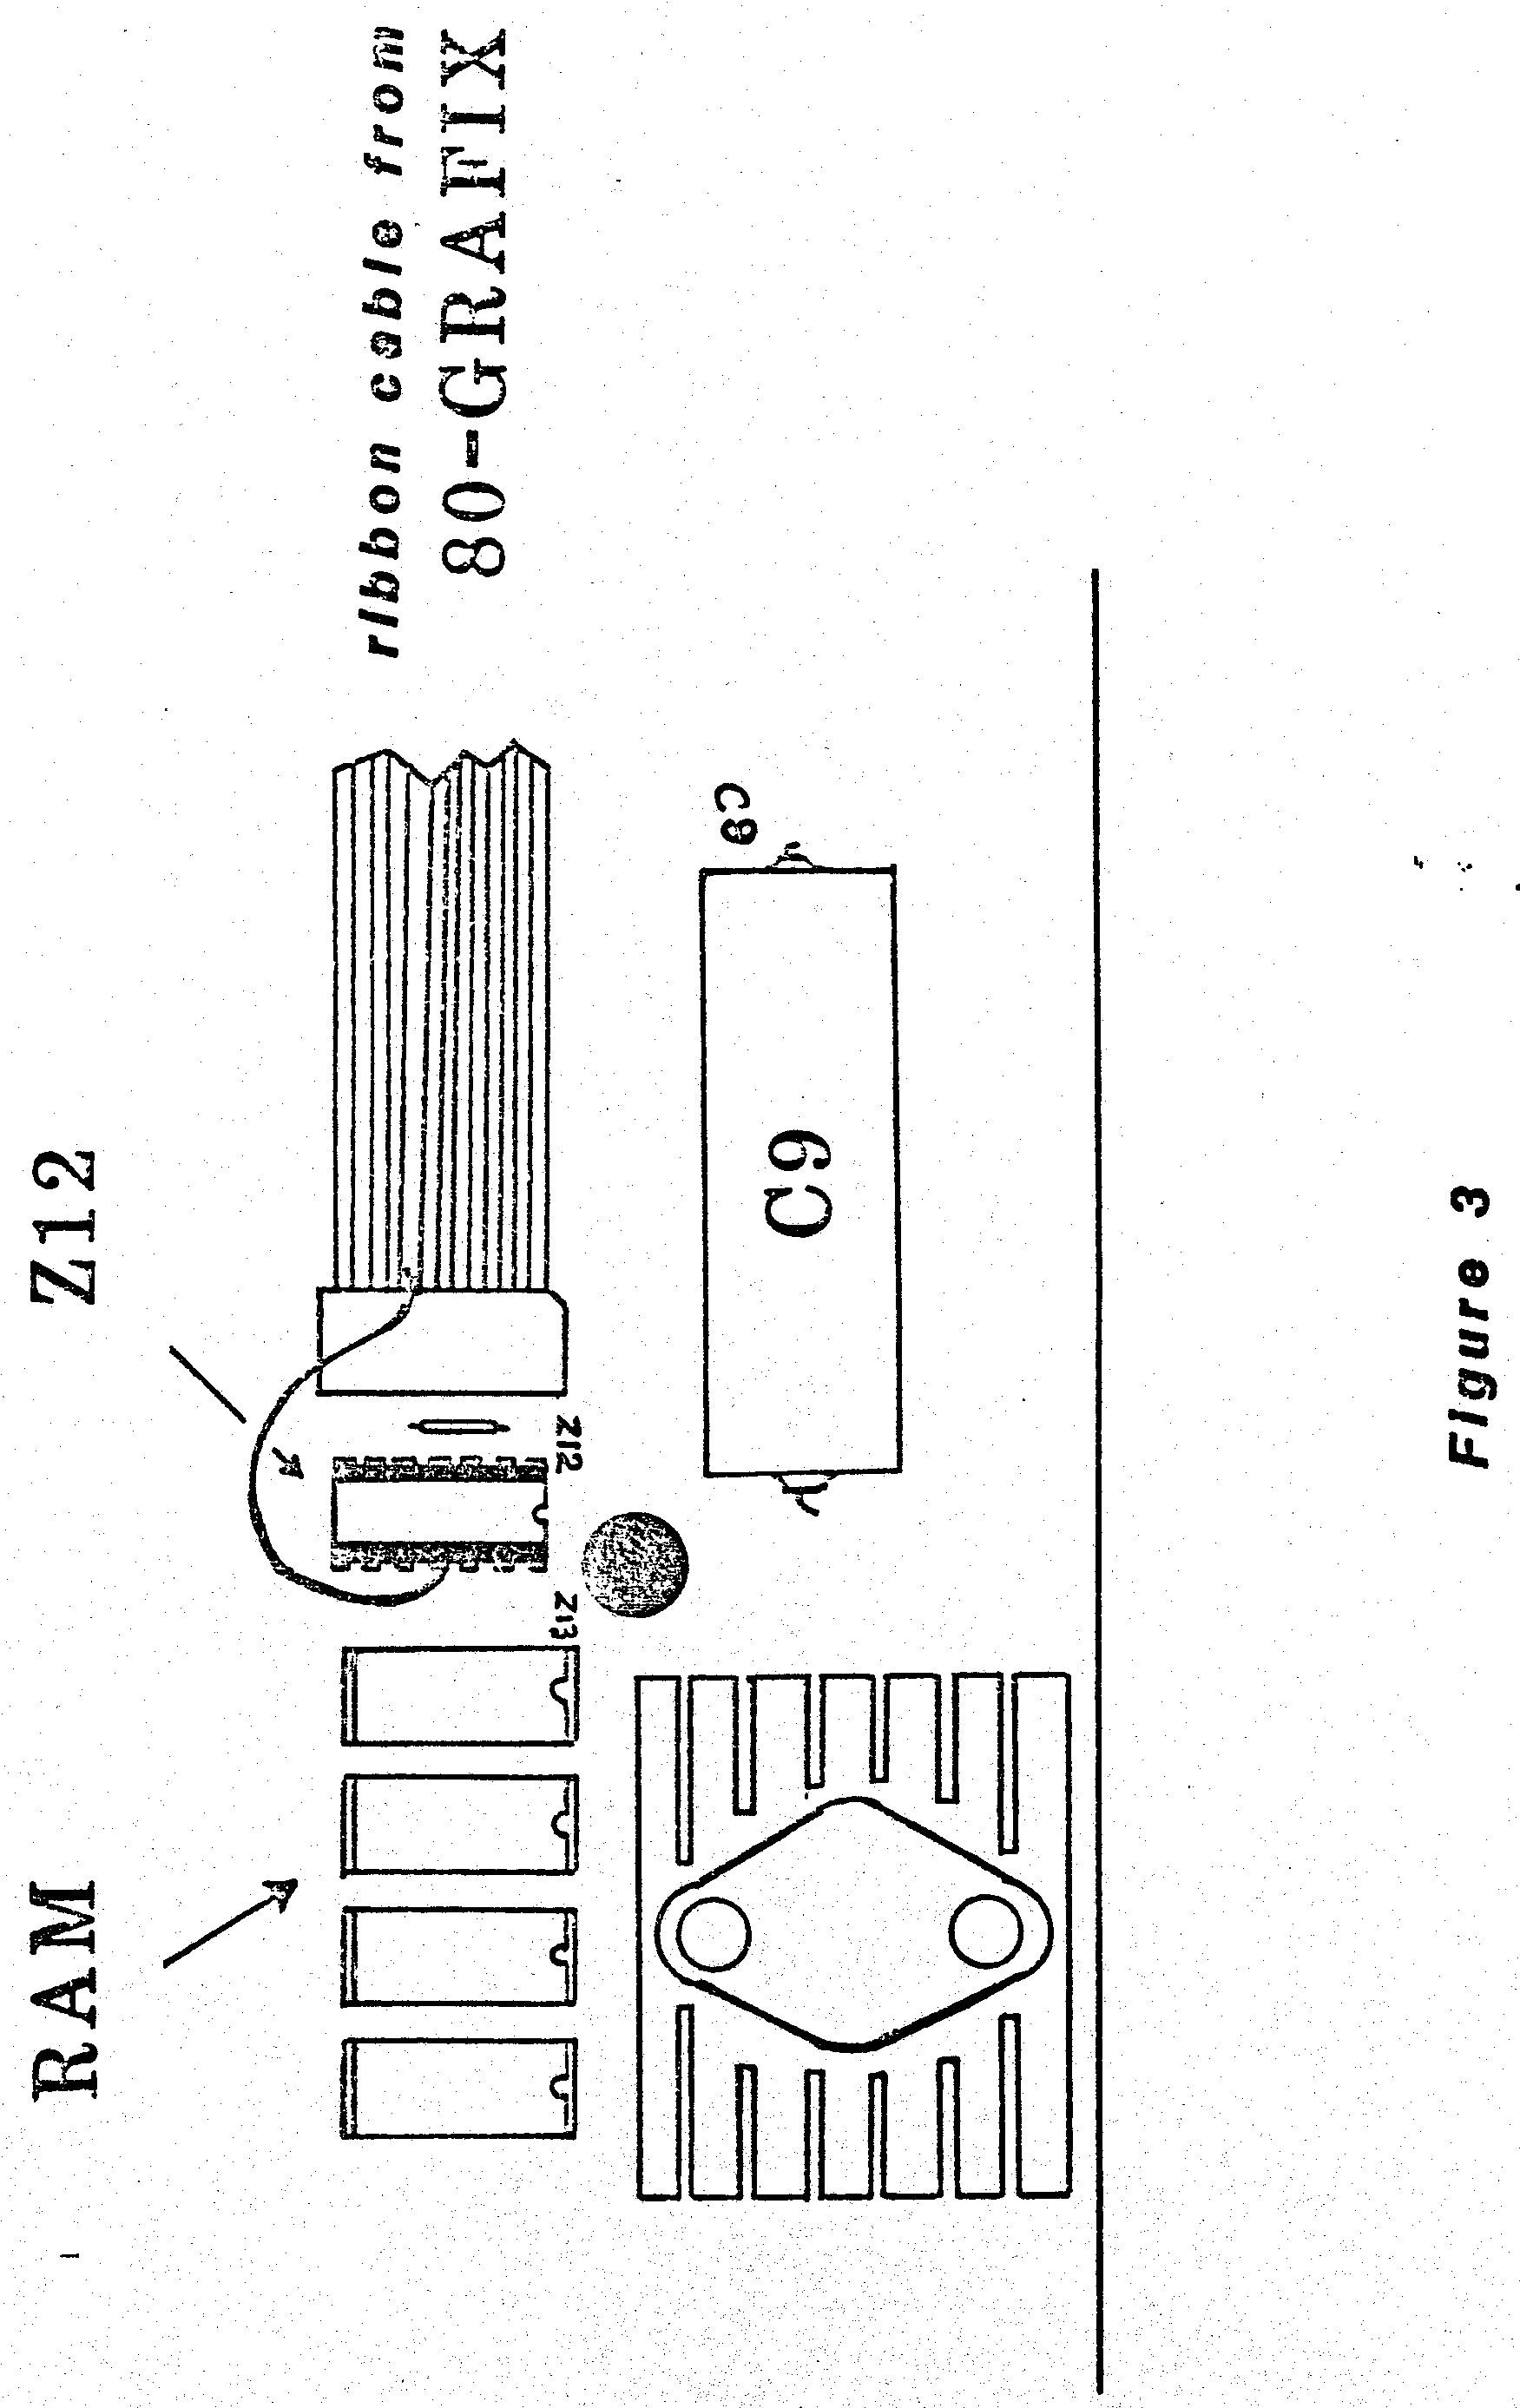
80-GRAFIX INSTALLATION July 1980 5. Locate IC (integrated circuit) #Z-11. This IC may be hard wired or in a socket, depending on which version of the board you have. If the IC is in a socket, CAREFULLY pry it up (grasp it by the ends and pull gently). If the IC is hardwired, locate pin 16 and CUT it with the dykes, being careful not cut any traces or other pins on the IC. 6. Bend the ribbon cables on the 80-GRAFIX board so that they fold back over the top of the connectors on the board, and lay the board on top of the TRS-80 components, with the circuit side up and the ribbon cables come out the left side. 7. Locate the solitary wire protruding from the 80-GRAFIX board, and IC #Z-25 on the TRS-80 PC card. USING GREAT CARE NOT TO OVERHEAT THE IC, solder the solitary wire to pin 8 of #Z-25 (furthest pin on the left side). Check this connection with a magnifying glass to be certain that no "solder bridge" has been created by accident, which would short out traces or one pin to another, and that the connection is solid. 8. Now position the ribbon connector furthest from you over IC #Z-47. Place a drop of glue (or the double-faced tape) on top of the EC, and press the connector firmly down onto the IC, making sure that all leads make contact with their respective IC leads, and are not touching any other leads. If glue is used to hold the connection together, make sure that the connector is flush with the top of the IC when pressed into place. It will be necessary to trim the ends of the connector leads a bit if the connection is not flush. In all of our tests, this type of connection has proven reliable. It is therefore not recommended that the connectors be soldered directly to the IC's since it makes them difficult to remove, and the IC may be damaged if overheated. Of course, if you have a lot of experience with this type of work, you may prefer to solder low-profile sockets to the TRS-80 IC'S, and plug the connectors into those sockets. (The same procedure is followed as in step #8 for attaching the remaining ribbon connectors.) - 4 -
8O-GRAFIX INSTALLATION July 1980 9. Place the next furthest able on IC #Z-29 so that pins #1 and #18 are not connected. You will note that IC #Z-29 is an 18 pin IC, and our connector has only 16 pins, so it is positioned off-center, such that the two IC pins closest to you are disconnected. 10. The next furthest connector (which has 2 missing pins and a wire protruding from it) is connected to IC #Z11. (If your TRS-80 had a socket for this chip, insert the connector into the socket.) Locate pin #11 on IC #Z-12 (center pin on the left side.) Using the caution discussed earlier, solder the wire from the connecter cable to pin #11, and check your work for the usual pitfalls. 11. Now the final connector (the lonqest one) is attached to IC #Z-75, over on the opposite side of the board. You should now carefully compare your completed installation with the accompanying illustration. If everything checks out, you can reassemble your computer. The 80-GRAFIX board will fit inside the right "foot" (compartment) of the keyboard and may be secured with the adhesive pads supplied. Make sure that you do not knock any of the connectors loose when putting the keyboard back together. Now comes the fun (we hope!). Plug in the power and video cables, and fire it up! If everything appears normal on the screen (ie. "Memory Size" appears), then we are ready! If anything unexpected happens, Quickly turn off the power and proceed to the "Trouble Shooting Your Installation" section. You can now check out the 80-GRAFIX by typing in and running this program: 10 CLS: OUT 255, 32 :set to normal screen 20 FOR X = 0 TO 255 :poke rom character set 30 POKE X+15616,X : on screen 40 NEXT 50 INPUT"HIT ENTER FOR HI-RES! READY";A$ 60 OUT 255, 160 :set to hi-res mode This program will display the entire set of TRS-80 characters twice, followed by the standard set of graphics characters (also twice). When you press the "ENTER" key, the mode latch is set to high resolution, and the graphics characters should be replaced by vertical stripes or a bunch of tiny random light and dark dots. (If this does not happen, turn off the power and refer to the "Trouble Shooting" section.) - 5 -
80-GRAFIX INSTALLATION July 1980 The new characters on the screen display the contents of the 64 programmable characters. They are not recognizable as anything because they have not been programmed, but this test shows that the board is installed and functioning correctly. If you are up and running, GOTO section 2.0. - 6 -
80-GRAFIX TROUBLE SHOOTING July 1980 1.1 TROUBLE SHOOTING YOUR INSTALLATION Your 80-GRAFIX board has been thoroughly burned-in and tested before it left the factory. Therefore, if any problems in operation have been encountered, you should first suspect an installation problem. Here are a some of the possible problems and their probable causes: 1. TOTALLY DARK SCREEN ON POWER-UP This can be a serious problem. First, ascertain that the monitor is connected and functioning properly. If the condition persists, it probably indicates that two or more pins on the TRS-80 circuit board have been shorted together. Such accidental shorting of wires could damage other components in your computer. Carefully trace every connection you have made with a magnifying glass, and check for "solder bridges" and bent connectors. Using an ohm meter to check the integrity of circuits would also be a good idea. 2. SPARKLING, GREY SCREEN (no image) This condition can likely be traced to the connector on IC #Z-11. Make sure the correct pins are attached, and firmly in contact. 3. RANDOM FLASHING DOTS DURING TEST PROGRAM RUN Check the connection to IC #Z-12 to be certain that it is correctly installed on the proper pin, and is firmly attached. The next most likely culprit is the connection to IC #Z-11. 4. RANDOM SPARKLING DOTS ON SCREEN Trace the connection to IC #Z-29 for correct installation and good contact. 5. OLD TRS-80 GRAPHICS ARE DISPLAYED DURING TEST PROGRAM The single wire connection to pin 8 of IC #Z-25 or the connection to IC #Z-75 is probably incorrect or has not made good contact. - 7 -
80-GRAFIX TROUBLE SHOOTING July 1980 (Any time that the 8O-GRAFIX board fails to properly display programmed characters, does not blank out the graphics characters on the screen while in the "programming mode", or displays normal graphics while in the "hi-resolution mode", these connections are usually the culprits.) 6. IMPROPER REPRODUCTION OF PROGRAMMED CHARACTEPS If a character-generating program (such as "CREATE", which is included with the 80-GRAFIX board) fails to return the characters created, check the connection to IC #Z-47 for proper installation and contact. In general, you should carefully check every connection to make sure it is in the right place, the connectors are well seated, and the two solitary wires are properly soldered. If you are still unable to find and correct the problem, write to the factory and give a detailed description of all aspects of the problem. If you find and correct all errors in the installation, and 80-GRAFIX still fails to perform properly, it is possible that your mistake may have damaged the 80-GRAFIX board, the TRS-80, or both. If this is the case, be sure to describe everything you did when you installed the board in your letter. - 8 -
80-GRAFIX THEORY OF OPERATION July 1980 2.0 THEORY OF OPERATION If you have a copy of the "TRS-80 Micro-Computer Technical Reference Handbook" (Radio Shack Cat. # 26-2103), you will find detailed descriptions of the various components that we will be discussing in this section. The video section of your TRS-80 consists of a 1K block of video RAM, a Character ROM (MCM6670) which generates the alpha-numeric characters, and multiplexer (74153) which allows the generation of crude graphics with a resolution of 128 horizontal by 48 vertical. Each alpha-numeric character is stored in the Character ROM as a pattern of bits (1's or 0's) in a matrix of 5 horizontal and 7 vertical. Graphics characters are created in a different fashion, and produce "cells" that are 2 horizontal by 6 vertical, but use all 12 of the scan lines on each line. 80-GRAFIX supplies an alternate graphics memory which gives the graphics mode a selection of dot patterns similar to the alpha-numerics patterns, except that each character is a grid of 6 horizontal by 12 vertical. (More on this later.) The TRS-80 mixes alpha-numeric and graphics characters on the screen, and knows which type to display by checking the status of the MSB (Most Significant Bit) in each of the 1024 bytes of video RAM. If the MSB is HIGH (on) then a graphics character is displayed. A LOW (off) condition indicates an alpha-numeric character. By the way, the difference between on and off (0 or 1 binary) has the effect of adding or subtracting 128 from the value of each byte. Graphics values range from 128 to 191 decimal (80 to BF Hex). The TRS-80 Video memory consists of 1024 locations (bytes), located at RAM addresses 15360 thru 16383 (3COO to 3FFF Hex), and are output to the video monitor as 16 rows of either 64 or 32 characters. These memory locations are accessible from Basic with the PEEK, POKE and PRINT statements. More information is available in the Level II Basic Handbook for the above functions as well as use of CHR$ values. Also refer to the memory Map, Table of Functions, ASCII and Graphics Codes Appendices for clarification of screen addressing. There is one difference between normal TRS-80 Video RAM and the rest of RAM memory: There are only 7 bits in each byte! The 8th bit has been chopped off, thus characters with a value of less than 32 that are POKED into ram will return a PEEK value with 64 added, and values higher than 191 have 128 subtracted when PEEKed. If you have had a Radio Shack lower case kit installed, the 8th bit is reinstated, and the Video RAM will act like all the rest. (Other types of lower case kits also do the same thing, some have a by-pass switch for this extra bit, others control it from software.) This memory arrangement has no particular effect on the use of 80-GRAFIX, but is worthy of noting for future programming applications. Installing the 80-GRAFIX board expands the graphics screen to a resolution of 384 horizontal and 192 vertical, which is - 9 -
80-CRAFIX THEORY OF OPERATIONAL July 1980 accomplished, as mentioned earlier, by providing graphics cells of 6 by 12. 80-GRAFIX also provides a software controlled MODE SELECT LATCH, which is addressed through the cassette port. There are three MODES of operation for SO-GRAFIX: 1. Normal Display - displays regular TRS-8O graphic characters. 2. Hi-Resolution - displays the character set that is is programmed into 80-GRAFIX. 3. Programming mode - causes 80-GRAFIX to accept programmable character data and generate a set of characters. 80-GRAFIX has onboard a 1K (byte) by 6 (bit) block of memory which serves as the Programmable Character RAM (PCR), from which the Video RAM will summon the character cells just as it does from the MCM6670 Character ROM. The PCR is organized into 64 groups (let's call them "FIELDS"), which represent the programmable character set. Each PCR Field has 16 bytes, the first 12 of which contain the data for each line of the character (the last 4 bytes in each Field are ignored). When set to the "Programming mode", 80-GBAFIX uses the Video RAM as its programming "data buffer". In this mode, the user's character data is moved to the screen which is then read as the image of the PCR, and copied into PCR memory. To prevent a lot of garbage from appearing on the screen, any character with a value of 128 or higher is blanked out. 80-GRAFIX's 6 by 12 Programmable Characters allow access to every dot in every line of each character. This allows for continuous graphics as each dot in the bit matrix corresponds to a dot on the video monitor. When a graphics cell is viewed on the monitor, the MSB is located at the extreme left and the LSB is to the extreme right on each scan line in the cell. - 10 -
80-GRAFIX USING THE 80-GRAFIX July 1980 3.0 USING THE 80-GRAFIX 3.1 MODE CONTROL As mentioned in the previous chapter, 80-GRAFIX has three modes of operation which are selected by outputting a value to the cassette port (Port 255 decimal, FF Hex). The three most significant bits 5, 6, and 7, are used as control bits when this value is sent to the port. The following statements control the Mode of Operation in Basic: 1. OUT 255,32 - sets 80-GRAFIX to display the normal TRS-8O graphics blocks. (Control bit 5). In this mode, the TRS-80 is just as it was prior to installation of 80-GRAFIX. This is the normal power-up condition of the board. This mode may be switched in and out at any time, and will have no effect on any programmed characters that are in the 80-GRAFIX board. 2. OUT 255,160 - sets 80-GRAFIX to Hi-Resolution graphics, and displays whatever character set you have programmed into the board. (Control bits 5 and 7). In this mode, normal graphics are replaced by Hi-resolution. Alphanumerics are unchanged. 3. OUT 255,96 - sets 80-GRAFIX to the Programming mode. (Control bits 5 and 6). Any characters which are POKEd or PRINTed on the TRS-80 screen are read by 80-GRAFIX, and stored as a bit pattern in the Programmable Character RAM. All characters which have the Most Significant Bit (MSB) set are "blanked out" on the screen, to avoid a display of "garbage" as the board is being programmed. You should exit this mode as soon as you have finished programming 80-GBAFIX. - 11 -
80-GRAFIX CHARACTER RAM PROGRAMMING July 1980 3.2 CHARACTER RAM PROGRAMMING The Programmable Character RAM is organized into 64 cells of 72 bits (in an array of 6 horizontal x 12 vertical). To program the PCR, the 80-GRAFIX is put into the PROGRAMMING mode (OUT 255,96), and the appropriate values are put on the screen in blocks of 16 bytes each, the first 12 of which are read by the PCR, (the last 4 bytes in each block are ignored). Each of the blocks of data correspond to a programmed character, and must begin at the first byte of the screen (15360 decimal, 3C00 Hex), with each successive block starting at a location which is a multiple of 16 from the first position. Thus the first block of data will occupy positions 15360+0 to 15360+15, the next block starts at 15360+16 and ends at 15360+27, and so on for all 64 characters. The number (byte) placed in the first position of each block will correspond to the bit pattern of the top row of that character; the second byte is the second row, and so on for each of the 12 rows of each character. If you were ever frightened by BIT LOGIC, now is the time to throw those fears in the Bit Bucket, because the values for each character you are creating is based on which bits are on or off. In fact, you can increase your knowledge of Binary Logic by using 80-GRAFIX, because here, my friends, is an actual device which translates those abstract terms into instant reality! But I digress. It is really quite simple to deal with this concept. For each dot you wish to light of the six horizontal positions, the corresponding bit is turned on. Thus, if you want to, say light every other dot, the bit pattern would look like this: (MSB) 1 0 1 0 1 0 (LSB) To translate this into an every day number that can be programmed into 80-GRAFIX, simply add the values which are ON (which means there is a l in that position) together. Reading from right to left, the first (LSB) position has a value of 1, and each successive position represents DOUBLE the value of the previous one. Thus, our 6-bit byte has the following values: (MSB) 32 16 08 04 02 01 (LSB) So, taking the values in our example above, we can see that these bits are ON: (MSB) 32 xx 08 xx 02 xx (LSB) And by adding these position values together, our number turns out to be 42 decimal. Each of the 12 lines (values) can be easily determined by writing down the bit pattern you wish to represent, and following the above steps. - 12 -
80-GRAFIX CHARACTER RAM PROGRAMMING July 1980 Here is a sample character that will look like a left arrow: Line Character Binary Dec Hex ==== ========= =========== === === 1 * 0 0 0 0 0 1 1 1 2 * 0 0 0 0 1 0 2 2 3 * 0 0 0 1 0 0 4 4 4 * 0 0 1 0 0 0 8 8 5 * 0 1 0 0 0 0 16 10 6 ****** 1 1 1 1 1 1 63 3F 7 ****** 1 1 1 1 1 1 63 3F 8 * 0 1 0 0 0 0 16 10 9 * 0 0 1 0 0 0 8 8 10 * 0 0 0 1 0 0 4 4 11 * 0 0 0 0 1 0 2 2 12 * 0 0 0 0 0 1 1 1 The values derived by this formula are multiplied by 2, and added to 128 decimal before being placed on the Programming Screen. This is necessary to supress the display of "garbage" as the 80-Grafix Board is programmed. If you wish to observe the values being presented to 80-Grafix, for "debugging" purposes, omit the addition of 128 to the values, and the characters will be displayed, as only "graphics" characters are suppressed on the screen. This character is programmed and displayed by Program #1, below. By varying the X and Y coordinates, you can control the location at which the character is displayed on the screen. This character can be any of the 64 programmable characters by placing the 12 data bytes in any of the fields on the Programming Screen. You may view your entire character set at any time by entering the following statements (as a program or from Coinmand Level, as one line): CLS OUT 255,160 FOR C=1 TO 64 PRINT@(C-1)*8,C;CHR$(128+(C-1)); NEXT C This routine clears the screen, sets 80-GRAFIX to the Hi-Resolution Node, and prints the 64 graphic characters in succession on the screen, preceeded by the character number. Remember that the actual ASCII value of the character is 127+C (CHR$(l27+C)). - 13 -
80-GRAFIX CHARACTER RAM PROGRAMMING July 1980 PROGRAM #1 10 C=1 :REM C=Character No. 15 X=1 :REM X=1 to 64 (horizontal) 20 Y=8 :REM Y=l to 16 (vertical) 25 REM X=Y=1 is upper-left corner The following is data for the Character Cell: 30 DATA 1,2,4,8,16,63,63,8,4,2,1 35 POKE 16553,222 :REM correct data read 40 RESTORE:CLS 45 OUT 255,96 :REM Set board to Programming Mode 50 FOR Z=1T012 :REM Get data 6 program 80-Grafix 55 READ D 60 POKE 15360+(C-1)*16+(Z-1),D*2+128 65 NEXT Z 70 OUT 255,160 :REM switch to Hi-Res llode :REM Display programmed chr at X,Y 75 POKE 15360+(X-1)+(Y-1),16,128+(C-1) 80 END Now that you have keyed in and RUN program #1, you are ready to move on to bigger and better things! The following program (program #2), called "CREATE", is a basic program to allow you to actually "draw" each character on an enlarged grid, and see what it looks like in its actual size. CREATE also prints out the data statements you need to program the character into 80-GRAFIX. Once you are happy with the character you have created, copy down the data statements, and include them in future programs which will use that character set. ("CREATE" is supplied on cassette with the 80-GRAFIX board.) PROGRAM #2 1000 ' "CREATE" 1010 ' (c)1980 by Ted Carter 1020 ' (With comments by Ralph Burris) 1030 ' 1040 ' This program allows creation of Hi-Resolution 1050 ' Graphics characters when used in conjunction with 1060 ' 80-GRAFIX. It allows the user to design individual 1070 ' Programmable characters, and prints out a list of the DATA statements for each character. 1080 ' 1090 ' 1100 ' The techniques employed in this program may be used 1110 ' in other programs to reproduce the characters generated, using the data values shown as the 112O ' finished character. 1130 ' 1140 DIM A(6,12): 'Stores status of each grid block (on/off) 1150 POKE 16553,222: 'Correct ROM Data read error 1160 FOR X=1 TO 6: 'Loop through grid - 14 -
80-GRAFEX CHARACTER RAM PROGRAMMING July 1980 1170 FOR Y=1 TO 12 1180 A(X,Y)=0: 'Set up empty grid values 1190 NEXT 1200 NEXT 1210 OUT 255,96: CLS: 'Set to Programming Node 1220 FOR X=15360 TO 16383: 'Loop through screen 1230 POKE X,128: 'And set up blank chrs 1240 NEXT 1250 RESTORE: FOR X=1 TO 76: 'Loop through data statements 1260 READ D: 'Get character value 1270 POKE 15375+X,D*2+128: 'Convert to graphic value 12SO NEXT: 'and put on programming screen 12S5 1290 '*** Programmable character data - draws grid 1295 1300 DATA 63,32,32,32,32,32,32,32,32,32,32,32,0,0,0,0 1310 DATA 63,1,1,1,1,1,1,1,1,1,1,1,0,0,0,0 1320 DATA 0,0,0,0,0,0,0,0,0,0,0,0,0,0,0,0 1330 DATA 63,63,63,63,63,63,63,63,63,63,63,63,0,0,0,0 1340 DATA 63,0,0,0,0,0,0,0,0,0,0,0 1345 ' 1350 ' The following lines draw the Programming Grid 1355 ' 1360 OUT 255,160: 'Set to Hi-Resolution mode 1370 CLS:PRINT" 1 2 3 4 5 6": 1380 FOR Y=l TO 12:IF Y<10 THENPRINT" ";Y;" ";ELSE PRINT " ";Y;" "; 1390 FOR X=1 TO 6:IF A(X,Y)=0 THENPRINTCHR$(129);CHR$(130);:GOTO 1410 1400 PRINTCHR$(132);CHB$(132); 1410 NEXT:PRINT:NEXT:PRINT" "; 1420 FOR X=1 TO 12:PRINT CHR$(133);:NEXT: PRINT@4l8;CHR$(131); 1425 ' 1430 ' The following allows input of grid location to change 1435 ' 1440 PRINT@896,"ENTER X,Y OF DOT TO CHANGE "; 1450 PRINT@922," ";:INPUTA,B 1460 IF A<1 OR A>6 OR B<1 OR B>12 THEN 1440 1465 ' 1470 ' The following tests screen grid position for ON or OFF 1480 ' then changes value to opposite condition. 1485 ' 1490 R=15360+4+2*A+64*B: IF PEEK(R)=132 THEN 1510 1500 POKE R,132: POKE R+1,132: A(A,B)=1: GOTO 1520 1510 POKE R,129: POKE R+1,130: A(A,8)=0 1520 PRINT@960,"CHARACTER DATA: "; 1525 ' 1530 ' This section sets 80-GRAFIX to the "Programming Mode" 1535 ' 1540 OUT 255,96: FOR X=1 TO 12 1545 ' 1550 ' The following line reads values in A(X,Y) and converts 1560 ' to proper value for each of the 12 bytes in each 1570 ' programmable character. 1575 ' 1580 R=(A(1,X)*32 + A(2,X)*16 + A(3,X)*8 + A(4,X)*4 + - 15 -
80 GRAFIX CHARACTER RAM PROGRAMMING July 1980 A(5,X)*2 + A(6,X))*2 + 128 1590 POKE 15407+X,R: 'Load value into Programming screen 1595 ' 1600 ' The following prints out data value 1605 ' 1610 PRINT USING "000";R;: IF X<12 THEN PRINT ","; 1620 NEXT: PRINT@48,"";: OUT 255(160:PRINT" "; 1630 OUT 255,160: 'Set to Hi-Resolution display mode 1640 PRINT" "; 1650 GOTO 1440: 'Zero programming grid & get next character Using "CREATE" as a guideline for future program development, you will find that 80-GRAFIX is quite simple to manipulate in your software. For practice, why not dig out your favorite graphics game, find the CHR$ values that draw the pictures, and create your own set to replace them. Include a subroutine at the end of the program which puts your new characters into 80-GRAFIX, and play the game with YOUR character set! You can have a resolution of 192 by 192 for your new character set by going to the 32 character mode. As you are aware, this mode expands each character to double width, and prints every other character on the screen. The Basic statement PRINT CHR$(23) puts the TRS-80 into the 32 character mode, while CLS or PRINT CHR$(28) returns to the 64 character mode. The 32-character mode does not affect character programming. However, when using POKE to display the character set, be sure to POKE only to even-numbered screen locations, as the odd locations are not displayed. For further programming information, refer to the TRS-80 LEVEL II instruction manual for use of the PRINTS, POKE, and CHR$ functions, as well as the Memory Nap, Table of Functions, ASCII and GRAPHICS Codes. - 16 -
80-GRAFIX ASSEMBLY LANGUAGE TECHNIQUES July 1980 3.3 ASSEMBLY LANGUAGE TECHNIQUES Programming 80-GRAFIX in Assembly (machine) Language is just as easy as the Basic Language methods disussed above. At the end of this section is a complete listing of a Video Driver routine, the object code for which is included on cassette with your 80-GRAFIX board. First, set up a Data Buffer which contains the data for each character you will be programming. This buffer is organized in the same fashion as in a basic program, and consists of up to 64 "fields" of 16 bytes each, the first 12 of which speak to the 80-GRAFIX board. (Actually, if you wish to conserve space, fields of 12 bytes each can be moved onto the programming screen, positioned so that the 1st byte of each field begins at a position that is a multiple of 16, added to the start address of the screen.) For example: 1000 BUFFER: EQU $ ;The following data 1010 DEFB 081H ;is the same as that 1020 DEFB 082H ;used for the "arrow" 1030 DEFB 084H ;in part 3, above. 1040 DEFB 088H 1050 DEFB 090H 1060 DEFB 0BFH 1070 DEFB 0BFH 1080 DEFB 090H 1090 DEFB 088H 1100 DEFB 084H 1110 DEFB 082H 1120 DEFB 081H ll30 DEFB 080H ;Following is "dummy" 1140 DEFB 080H ;Data for filler. 1150 DEFB 080H 1160 DEFB 080H 1170; End of text buffer Now that the buffer area has been defined, it is a simple matter to "program" 80-GRAFIX with this data, using this technique: 2000 START: LD DE,03COOH ;Point to screen 2010 LD HL,BUFFER ;Point to text 2020 LD BC,16 ;Length of buffer 2040 LD A,96 ;Program mode 2050 OUT (255),A ;Set Board 2060 LDIR ;Move data to screen 2070 LD A,160 ;Set to HiRes Mode 2080 OUT (255),A 2090 CALL 01C9H ;ROM Clear screen 2100 JP 402DH ;Return to DOS The above routine will move the 16 byte buffer to the programming screen, and reset the board for Hi-Resolution display. The - 17 -
80-GRAFIX ASSEMBLY LANGUAGE TECHNIQUES July 1980 character programmed has an ASCII value of 80H (128 decimal). A routine to display this character may look like this: 3000 DSPLY: CALL 01C9H ;Clear screen 3010 LD A,80H ;Character no. 3020 LD (3COOH),A ;Put chr on screen 3040 RET ;Return to caller This routine cleared the screen and put ASCII character number 12S (the one that we programmed) on the screen in the upper left-hand corner. The Video Driver routine which follows incorporates these techniques to give you a "Lower Case" character set. It also incorporates some other items of interest, such as installing a new video driver, and a self-protection feature that puts it at the top of your memory, and lets the TRS-80 know that it is there, so that it won't be "crashed into" by other computer operations. *** NOTE *** When you use the Video Driver in your machine, it will display all normally upper case (shifted) entries as upper case characters, and all lower case (unshifted) characters as the GRAPHICS lower case set which is provided. You will SEE LOWER CASE on tne screen when using this driver, but remember, the characters that you see are NOT Lower Case in the usual sense, but rather GRAPHICS. This means that if you switch to normal graphics (OUT 255,32)/ you will see GARBAGE on the screen. It also means that the lower case set is not compatible with such programs as "The Electric Pencil", "Scripsit", or any other word processer designed for lower case entries. However, any Basic programs you write will work on any machine, as the characters that go in are unchanaed. If you run the program on a non-80-GRAFIX machine, or without the Video Driver, it should display the characters normally, as all upper case. For further information on programming in Assembly Language, the following books are recommended: TRS-80 Assembly Language Programming by Wm Barden RS Catalog # 62-2006 Z-80 Microcomputer Handbook by Wm Barden Howard W. Sams & Co. Z-80 Assembly Language Programming Manual from Zilog - 18 -
80-GRAFIX ASSEMBLY LANGUAGE TECHNIQUES July 1980 ; *** Keyboard driver for 80-GRAFIX *** SCREEN EQU 3C00H ORG 7000H START LD A,96 ;Program Characters mode OUT (255),A LD HL,TXT ;Letter text buffer LD DE,SCREEN LD BC,BOTTOM-TXT LDIR ;Move data to screen ; Following section displays character set & jumps ; to DOS READY. SHOW LD A,160 OUT (255),A ;Set to Display mode CALL 01C9H ;ROM Call to clear screen LD A,128 LD DE,SCREEN NEXT LD (DE),A INC A INC DE CP '*' ;Compare for end of text JR NZ,NEXT LD BC,LAST-ENTRY LD HL,(4049H) ;Use 40B1H for LV2 SBC HL,BC ;compute length of driver PUSH HL DEC HL LD (4049H),HL ;Protect driver (40B1H=LV2) POP DE LD HL,ENTRY LD (401EH),HL ;Install new Video Driver LDIR ;and move it to new lac. JP 402DH ;Ret to DOS (06CCH =LV2) TXT EQU ; User text buffer area ; Fill with data statements to create chr set ; ; NOTE: Data in groups of 16 bytes - up to 64 ; blocks may be included. BOTTOM DEFB '*' ;End of text marker ; Video driver - converts upper to lower ; & lower to grafix ENTRY LD L,(IX+03) ;Same as ROM routine LD H,(IX+04) JP C,049AH LD A,(IX+05H) OR A JR Z,AGN LD (HL),A AGN LD A,C CP 80H ;Compare for grafix value JP NC,04A6H ;Display graphic chr CP 20H ;Compare for control chr JP C,0506H ;Do control code CP 41H ;Compare for numeric chr JP C,047DH ;Do normal display CP 60H ;Compare for lower case JR NC,FIX ;Go if lower case - 19 -
80-GRAFIX ASSEMBLY LANGUAGE TECHNIQUES July 1980 ADD A,3FH ;Bump to graphics value Jp 047DH ;Back to display routine FIX SUB 20H ;Make lower case into upper LAST JP 047DH ;Back to display routine END START ;Auto start The preceeding driver program can be used for any character set you wish to enter. For instance, if you wanted to program in APL, you could create the APL character set and insert the data statements as indicated above. The driver will now display the APL set instead of lower case (shifted entries remain unchanged, of course.) - 20 -
80 GRAFIX PROGRAMMING MOVING GRAPHICS July 1980 3.4 PROGRAMMING MOVING GRAPHICS In order to make an object appear to move on a horizontal plane across the screen, it is necessary to program up to 12 different characters in order to represent the movement. Since you can move each character only 6 horizontal (or 12 vertical) dots, you must use six sets of two character cells to represent each position of the move, with each cell's dot pattern shifted one dot to the right (or left). Each pair of cells is printed at the same screen location until all six pairs have been displayed, then the next screen position is used in the same fashion, until the object has "moved" across the entire screen. Very effective displays can be created in this manner, even when using Basic for the display. The same scheme may be emploved to move objects in any direction on the screen. For fast-moving objects, or where less resolution is required, single dot movement is not necessary, and you could move the dot pattern 2 or more positions in each character, using fewer characters for each move. In Assembly programs, the initial set of characters could be created, and the "animation" segments could be created by "bit shifting". For example, if the object you wish to animate takes, say, 12 bytes to draw (as in a rocket ship), the first 12 characters could be the basic ship. Your assembler program can then be made to read each of the initial 144 data statements (12 per character), and Shift Left Arithmetic (SLA) or Shift Right Arithmetic (SRA), each of the data bytes, placing the 'new value in the data fields following the initial group. The same procedure may be followed for each group of characters until the required number have been created. It is possible to do (his "on the fly", generating a new set of characters between each display, to have a lot of characters in each set moving around. - 21 -
80-GRAFIX OTHER PROGRAMMING IDEAS July 1980 3.5 OTHER PROGRAMMING IDEAS In addition to the methods discussed in the previous section, the Assembly language programmer will find a wealth of possibilities for addressing 80-GRAFIX. For example, using the bit shifting techniques mentioned above, one may employ the carry bit to dynamically program the next character in a sequence of animated figures. A reverse character set may be created by reading the intial data and complementing (CPL) each byte before storinq it in the new (or previous) position. 80-GRAFIX offers the opportunity to explore Bit Logic to its' fullest extent, since each character cell is a true image of the binary values that are fed into the board. The BASIC programmer can employ similar techniques in re-arranging the data values. For example, suppose you have set up an array to contain the bit values for each line of data, as in the "CREATE" program, above. Using the NOT statement, one could create the same effect as CPL in the above example in this fashion: 10 ' A(X) array stores a "1" or "0" for bit value 20 FOR X=1TO72 30 A(X)=2+NOT A(X) 40 NEXT X In this routine, the "bit" value of each cell is tested for on (1) or off (0). If the bit is on (1), the NOT function in line 30 will return a value of -2, and adding 2 to it will make it zero. If the bit is off (0), NOT returns a value of -1, which, when added to 2 produces a one. This array is processed as in "CREATE", and the new data value is used to program 80-GRAFIX. A similiar routine to produce a left bit-shift effect could take this form: 10 FOR X=1TO 12: 'Twelve rows 20 FOR Y=lTO6: 'Six columns 30 V=(X-1)*6+Y: 'Actual array position 40 A(V)=A(V+1): 'Shift the value left 50 NEXT Y: 'Do the row 60 A(V)=0: 'Zero right position in row 70 NEXT X As you can see, the value of each higher position in the array is brought down one position (or pulled from the position to tne right in each "row"). - 22 -
80-GRAFIX OTHER PROGRAMMING IDEAS July 1980 To perform a right shift, this routine might be used: 10 FOR X=1TO12 20 FOR Y=6TO2 STEP-1 30 V=(X-1)*6+Y 40 A(V) =A(V-1) 50 NEXT Y 60 A(V)=0 70 NEXT X Here is a short routine you can RUN which will illustrate these ideas: 10 DEFINT X-Z: 'Use integers 15 DIAM A(73): 'Dimension array 20 FOR X=1TO72: 'Set up random bit pattern 25 A(X)=(RND(2))-1: 'As "1" or "0" 30 NEXT X 35 FOR X=1T012:FOR Y=1T06: 'Show bit values 40 PRINT A((X-1)*6+Y); 45 NEXTY 50 FOR Y=6T02 STEP-1: 'Shift right 55 V=(X-1)*6+Y 60 A(V) =A(V-1) 6S NEXTY 70 A(V-1)=0: 'Zero left row position 75 FOR Y=1TO6: 'Print the new values 80 V=(X-1)*6+V 85 PRINT A(V); 90 NEXTY:PRINT 95 NEXT X This routine shows the value of each row and column, shifts the value to the right, and displays the new values for the row. - 23 -
80-GRAFIX SOME PARTING THOUGHTS July 1980 3.6 SOME PARTING THOUGHTS By now, we're sure that your head is literally spinning with ideas and applications for your new 80-GRAFIX capabilities, and frankly, we are anxious to see what ideas you come up withl Here are a few of the ideas that 80-GRAFIX's designer, Ted Carter, came up with: Display music notes IC timing comparisons Computer art Building layouts Automotive design Graphs Special characters (Algol, APL, Greek, etc.) Underline words Inverse video characters Lower case characters ... and so on. The rest is up to you! END OF 80-GRAFIX DOCUMENTATION. - 24 -
 D
D