Olivetti M10 PORTABLE COMPUTER Operations Guide


                8.  THE TELCOM PROGRAM

The TELCOM program is designed to allow the M10 to communicate with other 
computers,  either  by  transmitting  and receiving data over a telephone 
line or by direct connection.  In this  program,  more  than  any  other, 
there  are major differences between the M10 MODEM and the models without 
this facility. All the functions and operations described in this chapter 
are available to the M10 MODEM.

For the user's convenience,  the  table  in  Figure  8-1  summarises  the 
differences  between  the  M10 MODEM and the other models for the various 
connections and operations of the TELCON  program.   It  also  lists  the 
required accessories for all of these options.  Thus the user can tell at 
a glance which operations ace available with his model and which  access-
ories are needed.

810 MODEMM10 WITHOUT MODEM
Direct connection
to a telephone line Modem cable
Not possible
Auto-dialling Modem cable Not possible
Manual dialling
from keyboard
Modem cable Not possible
Automatic log-on
to host computer
Modem cable Not possible
Data exchange
by telephone with
a host computer
Modem cable or
acoustic coupler
Combined acoustic
coupler/modem
Direct connection
to another
computer
Null modem
connecting cable
(cross cable) with
straight cable for
gender change
Null modem connecting
cable (cross cable)
with straight cable
for gender change
Fig. 8-1 Accessories for TELCON Options TELCOM allows the user an automatic dialling option (M10 MODEM only), and connection to another conputer either directly or via a telephone line. Thus data can be exchanged between the M10 and a host computer or com- puter service such as Compuserve or Dow Jones in the US. By using the various options at his disposal, the M10 MODEM user can automatically dial and log on to a host computer. All the different options available M10 Operations Guide 8-1
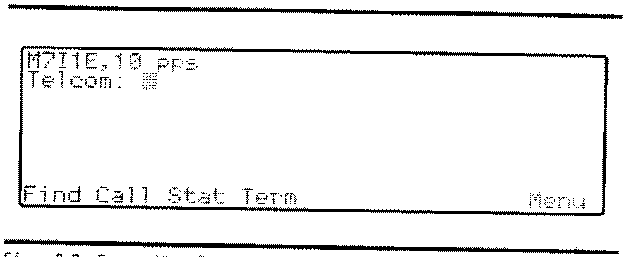
to both the M10 MODEM and the other versions of the M10 are described in detail in this chapter. To access the TELCOM program, position the cursor over the entry TELCOM on the main menu and press <ENTER>. The screen then appears as shown in Figure 8-2 below. TELCOM screen Fig. 8-2 Screen When TELCOM is Called The code which appears on the first line of the display is a list of the telecommunications parameters which are discussed in some detail later in this chapter. On the second line is the TELCOM pronpt. The bottom line displays the definition of the function keys on entering TELCOM. TELCOM operates in two different modes, Entry and Terminal. On first accessing the program it is automatically in Entry mode. In each of these modes the function keys F1-F8 have different definitions and uses. Entry mode is essentially for using the auto-dialling option while Termi- nal mode is for data exchange with another computer. The two modes can be used in sequence by the M10 MODEM to give an automatic dial and log-on option. In such a sequence, Terminal mode is entered automatically as part of the procedure; otherwise it is necessary to enter Terminal mode manually by means of the function key F4. CONNECTING THE M10 TO A TELEPHONE LINE The M10 can be connected to a telephone line, either directly or through an acoustic coupler. In the M10 MODEM version, both options are open. A special modern cable is used to make the direct connection to a modular telephone line and a simple acoustic coupler is used when linking the computer to the line via the receiver. In all other versions, the con- nection must be made through a combined acoustic coupler/modem in order to use the data communications facility offered by the TELCOM program. These three accessories - modem cable, acoustic coupler and combined acoustic coupler/modem are all available from your Olivetti dealer. It is particularly recommended to use the Olivetti MC 10 Modem Coupler, spe- cially designed for data coromunicatiois using the M10 without integrated modem. A detailed description of this device is given in Appendix C. 8-2
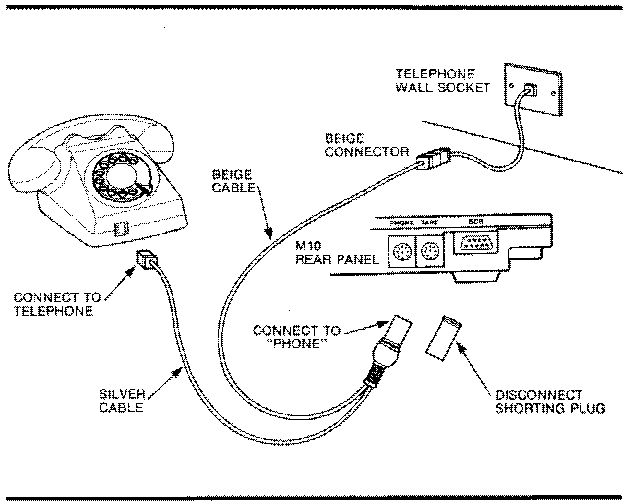
All countries hove their own legislation concerning the use of devices connected to the telephone network. Before connecting the M10 to the telephone system, make sure you are familiar with the regulations of your national PTT Administration. Your Olivetti dealer will be able to help you with this. In the US, before connecting the M10 MODEM to the telephone network, you must provide the local telephone company with certain information such as FCC ID, FCC Registration number and Ringer Equivalence Number. All the required information appears on the identity tag on the underside of the M10 MODEM. Figure 8-3 depicts the connection between the M10 MODEM and a modular telephone line, using a modem cable. direct telephone connection wall connection. 3. Plug the connector you have just renoved from the handset (and which goes to the wall socket) into the beige box at the end of the beige cable. 4. Remove the shorting plug from the other end of the modem cable and insert the round connector into the socket marked PHONE on the rear panel of the M10. 5. Set the DIR/ACP switch on the underside of the M10 MODEM to DIR. 6. The M10 MODEM is now connected for data exchange by telephone with another computer. If you do not need the telephone handset, simply connect the beige cable directly to the telephone wall socket. Tf you wish to use the telephone normally without undoing all the connections, remove the modem cable from the PHONE socket on the M10 MODEM and attach the shorting plug to the connector. Sometimes it is not possible to detach the line from the back of the telephone handset (in hotel cooras, for example). In this case you must use the acoustic coupler. 1. Connect the end of the coupler to the PHONE connector on the rear panel of the M10 MODEM. 2. Fit the cups of the acoustic coupler to the receiver so that the coupler speaker is over the telephone microphone and the coupler microphone over the telephone speaker. 3. Set the DIR/ACP switch to ACP. If you have the choice, always use the direct connection for a better and more reliable exchange of data. Note that the auto-dialling option is not available when the acoustic coupler is used. In all models of the 810 without inteqrated modem, it is necessary to use a combined acoustic coupler/modem in order to exploit TELCOM to the full. The Olivetti MC 10 Modem Coupler is the ideal equipment for this applica- tion. In this case, set up the the M10 for remote communication using the MC 10 as follows: 1. Connect the MC 10 cable to the RS-232C connector on the rear panel of the the M10. 2. Ensure that the CAL/ANS switch on the underside of the MC 10 is set to CAL. 3. Turn the power ON/OFF switch on the MC 30 to the ON position. The indicator lamp will show a green flashing light. The M10/MC 10 combination is now ready for connection to a telephone. 8-4
ENTRY MODE When you access TELCON from the menu, you are always in Entry mode. It is a mode of operation principally, but not exclusively, designed to provide the user of the M10 MODEM with an automatic dialling option. In addition, this mode controls entry to Terminal mode, the return to the main menu and iiiodification of the communications parameters. THE FUNCTION KEYS IN ENTRY MODE In Entry mode the function keys, as can be seen in Figure 8-2, control the following operations: F1 (Find) - Pressing this key enables the TELCOM program to find a name and telephone number already listed in the ADRS.DO file and to display it on the screen. This function is available only on the MODEM model. F2 (Call) - This key enables the M10 to call a specified number automati- cally when it is connected to a telephone line. Aqain this function exists only on the M10 MODEM. F3 (Stat) - This lists the current connunications parameters and allows the user to modify them. Lt is used for data communication with another computer and is dealt with in detail later in this chapter. F4 (Term) - This key changes the mode to Terminal. F5, F6 and F7 are.not used. F8 (Menu) - Returns the user to the main menu. AUTOMATIC DIALLING This option is available only to the M10 MODEM for which the TELCOM pro- gram has access to the ADRS.DO file set up in connection with the ADDRSS program (see Chapter 6 ). To find a name and telephone number listed in this file, proceed as follows: 1. Press <F1>. This brings up the prompt Find . 2. Enter the name of the person (or other identifying string) whose nunber is required, exactly as you would in a 'Find' operation in the ADDRSS program. The target string may be taken from any part of the entry in the ADRS.DO file i.e. name, address or telephone number. Press <ENTER>. 3. The bottom line of the screen changes to read F2 - Call, F3 - More and F4 - Quit. Meanwhile the first occurrence of the target string is indicated on the screen. What is displayed is, in fact, the corresponding record in the ADRS.DO file up to the second colon. If you have followed the recommended format for entering records in ADRS.DO, this will be: M10 Operations Guide 8-5
Name : telephone number (see Chapter 6 for details of how records are entered in ADRS.DO). 4. You now have a choice; pressing 'More' causes the computer to look for a further occurrence of the string pressing 'Quit' returns the TELCOM prompt; pressing 'Call' instructs the computer to dial the number displayed on the screen. Of course, in order to dial the number successfully, the M10 must be directly connected to a modular telephone line in the way described in the preceding section of this chapter. When 'Call' is pressed, the message Calling ..... appears on the screen. The dots represent the name of the person listed in ADRS.DO. As the number is dialled, the M10 emits faint but audible pulses and each digit is displayed on the screen as it is dialled. You must lift the receiver before the number is complete. This entire opera- tion from 'Find' through to completion of the number is the auto-dial option. To illustrate this explanation, let us take an entry from the ADRS.DO file already used as an example in Chapter 6, e.q. Peter King : 321=4961 : 85 Tavistock Avenue, Fernbury 1. Press <F1>, and, in response to the prompt Find type in "Peter" and press <ENTER>. 2. Immediately, the screen displays Peter King : 321=4961 i.e. the record up to the second colon. The result would be identi- cal if the target string was "Tavistock" or "321". 3. The functions 'Call', 'More' and 'Quit', corresponding to F2, F3 and F4, appear at the bottom of the screen. Press <F2> to initiate the dialling operation. 4. The screen displays the following message: Calling Peter King : As dialling proceeds, the digits appear one by one in the position indicated by the dots. At the same time, you will hear the faint sound of the pulse train for each digit. Note the two-second pause between the 1 and the 4. 5. You must pick up the receiver to take the call before the last digit appears on the screen. Note that this example can be tried without connecting the M10 MODEM to 8-6
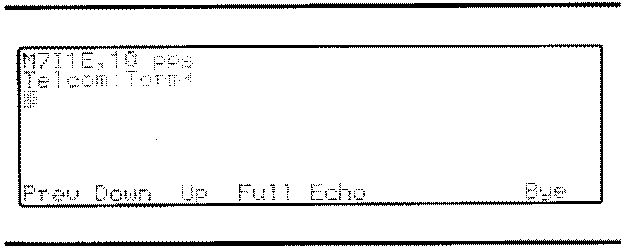
the telephone line, although needless to say no actual call can be made. In all other respects, however, the results are identical. MANUAL DIALLING Telephone numbers can also be dialled manually from the M10 MODEM key- board by pressing <F2>, typing the number after the prompt Call and pressing <ENTER>. Again the audible pulses are emitted and the digits displayed on the screen. The receiver must be lifted before the last digit is dialled. You can verify this procedure without connecting the M10 MODEM to the telephone Line. Even with the M10 MODEM connected directly to the telephone line, a number can be dialled in the classical way from the telephone itself. TERMINAL MODE The object of this mode of operation is to allow the M10 to communicate, either by telephone or directly, with other computers or information ser- vices - in effect to act as a terminal on a host computer. There are two ways of entering Terminal mode - automatically or manually. The former occurs when you follow the procedure for auto-dialling of a host computer or information service. This procedure, described later in this chapter, is available only to the M10 MODEM. Manually, Terminal mode is entered by pressing <F4> after the TELCON pro- gram has been called from the main menu. The screen then appears as shown in Figure 8-4. entering terminal mode THE FUNCTION KEYS IN TERMINAL MOOE As can be seen, the function keys F1-F8 now control different functions from those effective in Entry mode. Unlike the functions available in Entry mode, those in Terminal mode are identical for all models of the M10. They are: F1 (Prev) - Pressing this key enables you to view the previous eight lines of text on the screen when in Terminal mode. To return the display to its original position, press <F1> again. F2 (Down) - The purpose of this key is to save or 'download' incom- ing data from a host computer to a file for subsequent viewing. When you press <F2>, the following prompt appears on the screen: File to Download? Type in the name of the file to which the data are to be saved and press <ENTER>. To stop downloading press <F2> again. F3 (Up) - The purpose of this key is to allow you to send a file of data which you have prepared in advance for transmis- sion to the host computer. When you press <F3>, the prompt: File to upload? will appear on the screen. Type in the name of the pre- viously prepared file that you wish to send and press <ENTER>. This brings up the prompt: Width? The response to this prompt determines the maximum number of characters the M10 will send before inserting a carriage return and can have any value between 10 and 132. F4 (Full/Half) - This key switches the transmission between Full Duplex and Half Duplex. In Full Duplex mode, required by most host computer systems, the characters are transmitted to the host before appearing on the screen. In this way, you know that the character has been accepted by the host as soon as it appears on the screen. In Half Duplex, the characters appear on the screen and are transmitted simultaneously so there is no guarantee that what you read on the screen is in fact what the host computer has received. A noisy telephone line, for example, can distort the transmission. FS (Echo) - By connecting a printer to the M10 and pressing <F5>, you will obtain a hard copy of what is displayed on the screen. Thus you can retain a printed record of the 8-8
exchange with the host system. F5 is a switch key i.e. when it is pressed once, the function operates; pressing again disables the function and removes the label 'Echo' from the screen. F6 and F7 are not used. F8 (Bye) - This key allows you to leave Terminal mode. When you press <F8>, the prompt Disconnect? appears on the screen. In response, type <Y> (Yes) or <N> (No) and press <ENTER>. To disengage the M10 from the telephone system, you must enter 'Y'. This returns you to Entry mode. THE DATA COMMUNICATIONS PARAMETERS Reference was made earlier to the communications parameters which appear on the top line of the sceeen when the TELCOM program is first accessed. This represents the current values of the communications parameters. To communicate with another computer these parameters must match those of the host and you can set the appropriate values on the M10 within the limits quoted in Figure 8-5. M10 Operations Guide 8-9
PARAMETER POSSIBLE VALUES MEANING
Baud Rate M
1
2
3
4
5
6
7
8
9
Modem (300 baud)
75 baud
110 baud
300 baud
600 baud
1200 baud
2400 baud
4800 baud
9600 baud
19200 baud
Word Length 6
7
8
6 bits
7 bits
8 bits
Parity 0
E
N
I
Odd
Even
No Parity
Ignore Parity
Stop Bit 1
2
1 Stop bit
2 Stop bits
Line Status E
D
Enable
Disable
Dial Pulse Rate 10
20
10 pps
20 pps
Fiq. 8-5 Data Communications Parameters In Figure 8-2, the parameters are set to 37I1E, 10 pps which are the ini- tial values for the M10 MODEM. Other models have initial values of 37I1E. From the table it can be seen that this should be interpreted as: Baud Rate - M (Modem); this value is numerically 300 baud but it should always be set to M for the M10 MODEM, otherwise the modem is disabled. For all other models, the starting value is 3 (300 baud). Word Length - Initially set to 7 bits Parity - 1 for Ignore Parity Stop Bit - 1 stop bit Line Status - E for Enable Dial Pulse Rate - 10 pps; this parameter does not exist in models without integrated modem, since it determines the pulse rate used in auto-dialling, a facility available only to the M10 MODEM. 8-10
It is not imperative for the user to be conversant with the significance of all these parameters in order to be able to operate in Terminal mode with a host computer. The purpose of including then is to allow you to match the M10 to the specifications provided by the host. To change the communications parameters, access Entry mode and press <F3> (Stat). The prompt Stat appears on the display. Type in the commun- ications protocol (i.e. the string of parameters in the given format, as in M7I1E,10 pps) and press <ENTER>; the TELCOM prompt appears again. Now verify that the new values have been registered by the M10 by pressing <F3> again. When the Stat prompt appears, simply press <ENTER> and the new values will be displayed on the next line. Note that the communica- tions parameters are accessed and modified in Entry mode although their application is entirely in Terminal mode. The current values of the communications parameters can be checked at any time, using <F3> and <ENTER>. DATA EXCHANGE WITH A HOST COMPUTER Terminal mode is designed to allow the M10 to communicate with othec com- puters, either by direct connection or via a telephone line. In the case of the M10 MODEM, the connection to the telephone may be direct, as explained earlier in this chapter or, when this is not feasi- ble, by means of an acoustic coupler. For the M10 models without integrated modem, the connection must be via a combined acoustic coupler/modem. Before using the M10 in Terminal mode, it must be linked into the tele- phone system. Terminal mode can be accessed automatically or manually; automatic access to Terminal mode is available only to the M10 MODEM. In addition, this model offers the possibility of automatic log-on procedure to a host computer or information service, greatly facilitating access to a host system. ACCESSING TERMINAL MODE MANUALLY Manual access to Terminal mode is necessary in all models without an integrated modem and may be chosen, if one so wishes, with the M10 MODEM. To access Terminal mode on the M10 MODEM, proceed as follows: 1. Make sure that the M10 MODEM is connected to the telephone line as shown in Figure 8-3 or by means of an acoustic coupler. In the first case, set the DIR/ACP switch to DIR, in the second set it to ACP. 2. Now set the CAL/ANS switch (on the underside of the M10 MODEM) to CAL and access TELCOM. 3. Lift the telephone receiver and dial the number in the normal way. 4. When the host system replies to your call, you will hear a continu- ous, high-pitched tone. Press <F4> to enter Terminal mode. M10 Operations Guide 8-11
5. If the connection between the M10 and the telephone is direct, you can at this point simply replace the receiver. If you are using an acoustic coupler, reconnect the receiver to the coupler when you hear the continuous tone. When the M10 enters Terminal mode, it emits a high-pitched sound and the new designations of the function keys F1-F8 appear at the foot of the screen (see Figure 8-4). The M10 MODEM is now ready to log on to a host computer system. With all other models, it is necessary to use a combined acoustic coupler/modem to set up the M10 for remote communication with a host sys- tem. When using the M10 with the NC 10 Modem Coupler, carry out the fol- lowing procedure: 1. Ensure that the MC 10 is connected to the RS-232C interface connector on the rear panel of the 810 and that the ANS/CAL switch on the underside of the MC 10 is set to CAL. 2. Turn the power ON/OFF switch on the top of the MC 10 to ON. The indi- cator lamp will show a flashing green light. 3. Lift the telephone receiver and dial the number of the host system in the normal way. If the host system has automatic data transmission connection, you will hear a high-pitched, continuous tone when connection has been established. If the host system is manual, ask the operator to make the data transmission connection. When you hear the continuous tone, the con- nection has been established. 4. Once communication has been established, press <F4> to enter Terminal mode. 5. Fit the telephone receiver to the MC 10 cradle, first connecting the ear-piece then inserting the mouth-piece into the cup marked CORD. After a moment, the indicator lamp will show a continuous green light. When Terminal mode is entered, the f110 emits a high-pitched sound and the new designations of the function keys F1-F8 appear at the bottom of the screen, as shown in Figure 8-4. The M10/MC 10 combination is now ready for log-on to a host computer. 8-12
AUTOMATIC ENTRY TO TERMINAL MODE AND AUTO LOG-ON PROCEDURES This option, available only to the M10 MODEM, greatly facilitates the whole procedure of calling a host system and logging on to it. It may take you a little while to set it up but once you have done so your access to a host computer or computer service will be effected by a sin- gle command. Entering Terminal Mode Automatically To do this you must start with the ADRS.DO file, created when you first used the ADDRSS program (see Chapter 6). Let us suppose that you are a subscriber to an information service called International Data Services (IDS), whose telephone number is 492 77095. This information has to be recorded in the ADRS.DO file. Access ADRS.DO and make the following entry: IDS : 492=77095 < > This follows the standard format for entries in ADRS.DO with the excep- tion of the angle brackets whose significance will become clear later in this section. Now quit ADDRS5 and access TELCON. The procedure for autoriatic entry to Terminal mode is the following: 1. Ensure that the M10 is directly connected to the telephone system as described earlier and as shown in Figure 8-3. 2. Set the DTR/ACP switch to DIR, if you have not already done so. 3. Set the CAL/ANS switch to CAL. 4. Press <F1>, then, in response to the prompt Find type in IDS and press <ENTER>. This will cause the entry you have made in ADRS.DO to be displayed on the screen as shown below. IDS : 492=77095 < > while the bottom line of the display shows 'Call', 'More' and 'Quit' corresponding to F2, F3 and F4. 5. Press <F2> to initiate the auto-dial option. This brings up the mes- sage Calling IDS : 492=77095 < > the digits appearing one by one as they are dialled. There is no need to lift the receiver when auto-dialling a host system since the communication is not verbal. On completion of the number, the M10 MODEM emits a high-pitched tone to indicate that Terminal mode has been entered. At the same time, the screen changes to show the designa- tion of the function keys, F1-F8, in Terminal mode. In most cases, the M10 will echo what it "hears" at the other end of the line. If the line is free, you will hear the ringing, if it is engaged, you will hear the M10 Operations Guide 8-13
engaged signal and so on. Automatic entry into Terminal mode is now com- plete and the M10 MODEM is ready to log on to the host computer. The M10 MODEM is equipped with an automatic log-on protocol to further simplify your task. Automatic Log-On The combination of automatic dialling and automatic entry into Terminal mode allows one further extension of the system to give automatic log-on to a host computer or information service. Log-on procedures for comput- ers vary only in the details, the basic features, such as enterina user ID and password being common to them all. The M10 MODEM provides a series of key commands which allows you to take advantage of this fact and devise a protocol to execute an automatic loq-on with a single com- mand. When you become a subscriber to an information service or are given access to a host computer, you will be issued with instructions for the log-on procedure. What the the M10 MODEM offers is the possibility of encoding the procedure in a string of commands and storing this in the ADRS.DO file so that the entire sequence of calling the host and logging-on can be effected automatically. The four special command keys shown in the table below enable you to encode the log-on sequence and store it in the ADRS.DO file. KEY FUNCTION 7 Wait for specified character = Pause for two seconds I Send the next character as it stands A Send the next character as a control character ? This character tells the M10 to wait for a specific instruction or prompt before proceeding with the log-on sequence. If you know from the host's instructions that you must wait for the prompt User ID: before entering your identity, then the coded instruction to the M10 would be '?' followed by any character unique to that prompt (say 'U'). ?U is a coded message to the M10 saying "Do not proceed until you have received a prompt containing the character U". = This symbol, which you have already encountered in the description of the ADRS.DO file, imposes a delay of 2 seconds before continuing the log-on procedure. 8-14
! The exclamation mark tells the M10 MODEM to transmit the next char- acter as it stands. It provides the computer with a means of distin- guishing between key commands and characters to be transmitted. Thus if the combination != occurs anywhere in the sequence, the M10 MODEM will send the character = instead of pausing for 2 seconds as it normally would on encountering this character. ^ The circumflex causes the next character to be transmitted as a con- trol character. Hence ^4 tells the M10 MODEM to send Control-C. The entire log-on sequence is stored in the ADRS.DO file under the entry for the host's name and telephone number. It must be enclosed in the angle brackets < > immediately after the number. The best way to illustrate setting up a coded log-on protocol is by returning to the example used earlier. Suppose that IDS have assigned you the user TD 5138Q and the password 'Redwing' and that they have issued the following instructions for log-on: 1. Notify the system that you are ready to log-on by sending Control-C. 2. Wait for the prompt User ID: then enter the identity number you have been assigned. 3. Wait for the prompt Password: then enter your password. 4. Wait for at least 3 seconds then send the question OK?. 5. The system will send you the message Log-on successfully completed . Taking these instructions one by one you can now establish a coded sequence for the M10 MODEM. 1. It is good practice to leave a short delay between calling the number and starting the log-on to allow time for good communications to be established, so begin the sequence with =. The first instruction requires a Control-C which is written "C. So, after conplying with the first instruction, the sequence looks like this: =^C 2. Now you must inform the M10 to wait for the prompt User ID: then send the ID number assigned to you. There are only two prompts in the log-on procedure so choose any letter that is not common to both e.g. U, I or D. In this procedure, unlike many others, the 810 distin- guishes between upper and lower case characters. Thus U is valid as a unique character in the prompt, whereas u is not. Note also that you must select a single character since the key command ? applies only to the character immediately following it. The instruction ?U tells the M10 to wait for a prompt containing the character U. Now your ID is required, so continue with 5138Q. This has to be entered which you normally do by pressing <ENTER>. The keyboard equivalent of ENTER on the M10 is Control-M. Hence the instruction is terminated with ^M. The sequence for the second instruction is then: M10 Operations Guide 8-15
?U5138Q^M 3. In the same way the coded sequence for entering the password is: ?PRedwing^M where ?P tells the M10 to wait for a prompt containing the character P before transmitting the password. 4. This instruction requires a pause of at least 3 seconds; the charac- ters == give a 4-second pause. Now you are required to enter the question OK?. You must tell the M10 MODEM to transmit the question mark and not interpret it as a key command to wait, so this becomes OK!?^M. The final instruction gives rise to the sequence: ==OK!?^M Putting these all together in a single sequence gives the final protocol which has to be enclosed in angle brackets thus: <= ^C ?U 51380 ^M ?P Redwing ^M == OK!? ^M> Here the individual commands have been spaced out so that the user can readily identify them. When entering them in the ADRS.DO file they should appear as a single, long string as shown below: IDS : 492=77095 <=^C?U5138Q^M?PRedwing^M==OK!?^M> : To initiate the automatic log-on sequence, using the example just quoted as an illustration, the procedure is as follows: 1. Ensure that the M10 MODEM is connected directly to a modular tele- phone line. 2. Set the D1R/ACP switch to DIR and the CAL/ANS switch to CAL. 3. Access TELCOM and verify that the communications parameters correspond to the specifications of the information service IDS. If not, change them to the required values. 4. Still in Entry mode, press <F1> and, in response to the prompt Find type IDS and press <ENTER>. 5. The entry in the ADRS.DO file for IDS will be displayed on the screen, up to the second colon. Note that the loq-on sequence you have just entered between the angle brackets is not displayed although the brackets themselves are. This is to protect the secrecy of your User ID and password. Press <F2> 'Call', then <ENTER> to initiate automatic dialling. 6. The message Calling 105 :49277095 is displayed on the screen, the digits appearing one at a time as they are dialled. When the number has been dialled, you will hear the ringing tone. A high-pitched tone is emitted hy the M10 to indicate that Terminal mode has been entered. 8-16
Up to this point the procedure is that of auto-dialling. 7. At this point the automatic log-on sequence commences. The first indication you have of this is when the prompt User 1D: appears on the screen. The M10 MODFM responds to this automatically, according to the coded instructions you have given, and your user ID will appear in response to the prompt. 8. Next the prompt Password: appears on the screen. Again the M10 responds automatically but your password is not displayed. 9. After a 4-second pause, the auestion OK? will appear, followed by the message Log-on successfully completed . The M10 MODEM is now logged on to the IDS system. A word of caution here - if you attempt to simulate this procedure without connecting the M10 MODEM to a telephone line, the computer will block as soon as the simulated dialling is over because it can proceed no further. This blocking in TELCOM can even inhibit the automatic switch- off facility. If this happens, press <SHIFT> + <BREAK/PAUSE> to release the M10. MANUAL LOG-ON TO A HOST COMPUTER If you do not have the M10 MODEM but another version of the M10, then the automatic log-on sequence is not available to you. In this case, you must dial the host's number manually on the telephone and follow the instruc- tions for logging-on. By way of illustration, we shall take the exanple used in the last section. Since that section refers exclusively to the M10 MODEM, you may not have read it, so we shall repeat the essentials of the example here. Let us suppose that you are a subscriber to an infor- mation service called International Data Services (IDS), whose telephone number is 492 77095. Suppose, moreover, that 1DS have assigned you the user ID 5138Q and the password 'Redwing' and that they have issued the following instructions for log-on: 1. Notify the system that you are ready to log-on by sending Control-C. 2. Wait for the prompt User 1D: then enter the identity number you have been assigned. 3. Wait for the prompt Password. then enter your password. 4. Wait for at least 3 seconds then send the question OK?. 5. The system will send you the message Log-on successfully completed . The procedure is as follows: 1. Connect the MC 10 Modem Coupler to the RS-232C output on the rear panel of the MIO, set the ANS/CAL switch to CAL, and turn the power ON/OFF switch to ON, as explained earlier in the present chapter. If you are using another modem coupler, follow the operating instruc- tions provided by the manufacturer, to ensure that it is ready for calling a host computer. M10 Operations Guide 8-17
2. Access TELCOM from the main menu. Check that the communications parameters displayed on the first line of the screen correspnnd to the IDS specifications. 1f not, press <F3> and enter the appropriate values. Remember that with the MC 10, the maximum data signalling rate (baud rate) is 300 baud. 3. Lift the telephone receiver and dial the IDS number – 492 77095. As soon as communication has been esatablished, place the receiver in the cradle of the Modem Coupler as described in the section on manual access to Terminal mode. 4. Press <F4> (Term) to enter Terminal mode. A high-pitched tone is emitted by the M10 to indicate that Terminal mode has been entered. At the same time, the designations of Fl-F8 for Terminal mode are displayed at the foot of the screen. 5. Now follow the IDS instructions for the log-on procedure. 6. Having allowed a short delay to ensure that good communications have been established with the host, press <CTRL> + c to indicate to the 1DS system that you are ready to log-on. 7. Wait until the prompt User ID: appears on the screen then type in 5138Q and press <ENTER>. 8. In response to the prompt Password: which next appears on the screen, type 'Redwing' and press <ENTER>. Your password will not actually be displayed but it is transmitted to the host system. 9. Allow a short delay of at least 3 seconds then type in the question OK?. If everything has proceeded normally, you will receive the mes- sage Log-on successfully completed and the M10 wil) be logged on to the IDS system. USING THE UPLOAD AND DOWNLOAD FACILITIES In the introduction to Terninal mode of operation earlier in this chapter, reference was made to these two facilities when describing the function keys. The user requires some more details to make use of these options. The Upload Facility This option is provided to enable the user to prepare a file of informa- tion in advance for subsequent transmission to another computer, To do this proceed as follows: 1. Using the method explained in Chapter 5, create a TEXT file contain- ing the data to be transferred to another computer. Save this file to RAM. 2. Once you have established communication with the other computer via the TELCOM program and initiated the sequence on the host to prepare it to accept data, press <F3> (Up). 8-18
This brings up the prompt: File to upload? 3. Type in the name of the file you have previously created for this purpose and press <ENTER>. 4. In response to the prompt Width? which now appears, select a value between 10 and 132 and press <ENTER>. This determines the line width of the file to be uploaded. The physical line width of an M10 file is 40 characters (the width of the screen). However, because the word-wrapping feature makes carriage returns redundant for continuous text, a text line can be many times that width. If the M10 does not encounter a carriage return for a number of characters equal to the value entered as a response to the Width? prompt, it will impose one. All carriage returns encountered in the file are transmitted. If <ENTER> is pressed in response to the prompt, no extra carriage returns will be embedded. The Download Facility This option allows the user to "download" incoming data from a host com- puter i.e. to save it to a file for future reference. This is particu- larly useful when the data are coming in streams that require subsequent interpretation. To set this option in operation, do the following: 1. Since you are already in communication with a host computer, the M10 will be in the TELCOM program and in Terminal mode. Type the command to the host computer to initiate the data stream BUT DO NOT YET PRESS <ENTER>. Press <F2> (Down). This brings up the prompt: File to download? 2. Type in the name of the file in which the information is to be stored and press <ENTER>. You need not have created the file in advance; if you select a name not exceeding 6 characters in length, observing the rules for the nomenclature of TEXT files, it will be created and stored in RAM. 3. Press <ENTER> to complete the host command and start the downloading process. 4. While downloading is in progress, the label 'Down' at the foot of the screen appears "in negative" to indicate that the incoming data are being downloaded. 5. When you have downloaded the data you want, terminate the Download operation by pressing <F2> again. To read and edit the downloaded data, press <F8> (Bye) to terminate com- munication with the host computer. Press <Y> then <ENTER> in response to the prompt Disconnect? to disengage the M10 from the telephone network and return to Entry mode. Return to the main menu by pressing <F8> M10 Operations Guide 8-19
(Menu) and select the file containing the downloaded data. You can access and edit this as you would any TEXT file. Some editing may be required if the host system has inserted control characters in the transmitted information. If the file you have downloaded is a BASIC program file, you must enter BASIC and load the file. This will convert it to binary form and allow you to run and save it as a .BR file. If you save it as a BASIC file, the .DO file may be deleted. 8-20