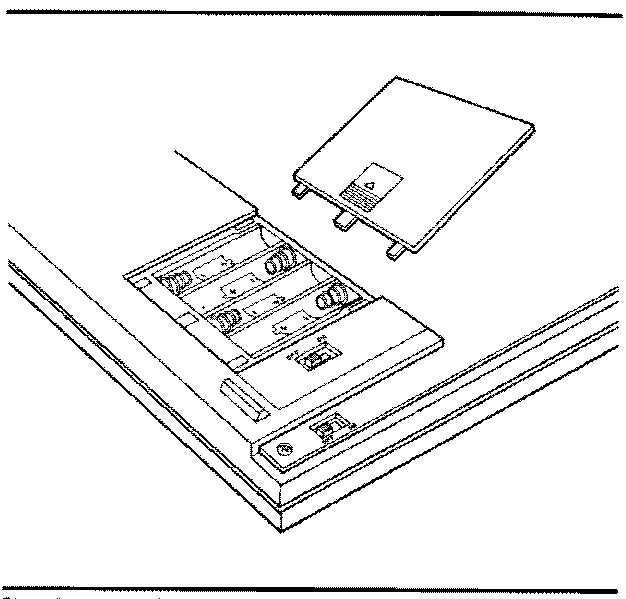
 Fig. 2-1 Installing the Battery
SWITCHING ON FOR THE FIRST TIME
1. Remove the cover from the battery compartment on the underside of the
M10 chassis.
2. Insert four 1.5V, size AA dry cells as shown in Figure 2-1.
Alternatively, connect the end of the cahle on the AC adaptor to the
jack marked DC6V on the rear pariel of the M10; plug the adaptor into
the mains supply.
It is important to remember that the M10 and all peripherals must be
turned off before connecting or disconnecting the AC ddaptor to the
M10.
3. Turn the memory ON/OFF switch to ON (on the underside, see Fig.1-10).
4. Turn the power ON/OFF switch to ON (on the underside, see Fig. 1-10).
2-2
It is important not to forget this last step as the computer will not otherwise function. To switch off the M10, first turn off any peripherals that may be con- nected (e.g. a printer) then turn the power switch of the M10 to OFF. Do not turn off the power to the memory as this will cause all the contents of the RAM to be !ost. Once the initial switch-on procedure has been carried out, the M10 is switched on and off using only the power ON/OFF switch on the underside panel, Note that the M10 will switch itself off after about 10 minutes if no keys are pushed. This is to preserve the battery. To return to normal operation, switch off then on again. This automatic switch-off feature can be disabled by means of the BASIC command POWER CONT or, alterna- tively, the time after which the M10 switches off can be modified by the BASIC command POWER. Details of these commands are given in the BASIC Language Reference Guide in Part 2 of this manual. M10 Operations Guide 2-3
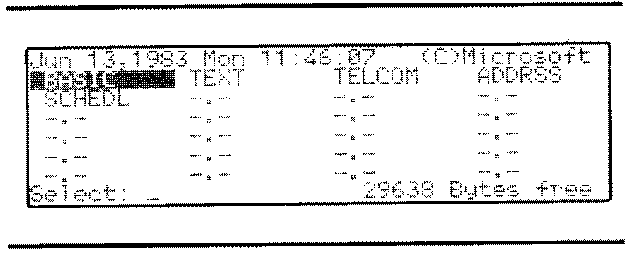
3. THE MAIN MENU When the M10 is first switched on the screen will appear as in Fig. 3-1. This is the main menu of the computer.
 Fig. 3-1 The Main Menu
It can be seen that the LCD carries 8 lines of text. The dark rectangle
positioned over BASIC is the cursor, which can be moved using the cursor
movement keys, described in Chapter 1. The word on which the cursor is
located appears "in negative". The screen contrast can be altered using
the control on the right hand side panel.
The first line of the display is taken by the date and time. On first
starting up this will read:
Jan 01, 1900 Sun 00:00:00 (C) Microsoft
The next 6 lines are reserved for a list of the.programs on the computer.
To begin with, there are only the five built-in application programs:
- BASIC
- TEXT
- TELCOM
- ADDRSS
- SCHEDL
There is room for a further 19 files to appear on the menu.
M10 Operations Guide 3-1
The bottom line shows: Select : _ 29638 Bytes free The option Select allows you to type in and access the program or file of your choice. This can also be done by positioning the cursor over the file name on the menu and pressing <ENTER>. The entry 29638 Bytes free refers to the available memory at your dispo- sal. The actual value of this parameter on start-up depends on the amount of RAM installed. The different values are shown below: memory Installed Bytes free 32k 29638 24k 21446 16k 13254 8k 5062 These values will, of course, diminish when you start to use the computer memory. On start-up, the cursor is set over the BASIC program. It can be moved to any other position by means of the cursor movement keys, indicated by arrows. To begin with, however, only BASIC, TEXT and TELCOM are avail- able. The procedures for setting up ADDRSS and SCHEDL are dealt with in Chapters 6 and 7 respectively. SETTING THE TIME As already noted, a read-out of the date, day and time appears on the first line of the main menu. Upon first switching on the computer this indicates: Jan 01, 1900 Sun 00:00:00 and it will start to record time from this datum forward. The procedure for setting this to current values is described below. TO RESET THE TIME: Position the cursor over BASIC and press <ENTER>. The cursor will appear as a flashing dark rectangle below the BASIC prompt, Ok . Type on the screen TIME$="hour:minute:second" and press <ENTER> where 3-2
hour is a two-digit number from 00 to 23 minute is a two-digit number from 00 to 59 second is a two-digit number from 00 to 59 in a form identical to the time on a digital watch. The computer clock will reqister this time from the moment that <ENTER> is pushed. If you do not enter the data correctly an error message will be displayed on the screen. To check the value you have entered, type: PRINT TIME$ and press <ENTER>. The time you entered will be displayed on the screen. TO RESET THE DATE: Type the date on the screen in the following form: DATE$="month/day/year" if you have the M10 MODEM DATES="day/month/year" if you have a European model and press <ENTER> where month is a two-digit number from 01 to 12 day is a two-digit number from 01 to 31 year is a two-digit number from 00 to 99 For example, the instruction DATE$="06/14/83" or DATE$="14/06/83", according to the model, enters the date as June 14, 1983. The command PRINT DATE$ will cause the date you entered to be displayed on the screen. M10 Operations Guide 3-3
TO RESET THE DAY: Type the day on the screen as follows: DAY$="day" and press <ENTER> where 'day' is one of the following three-letter abbre- viations: Monday - Mon Tuesday - Tue Wednesday - Wed Thursday - Thu Friday - Fri Saturday - Sat Sunday - Sun Again the value entered can be checked by typing PRINT DAY$ and pressing <ENTER>. To return to the main menu, press function key <F8>. The day, date and time which you entered now appears on the first line of the menu. 3-4
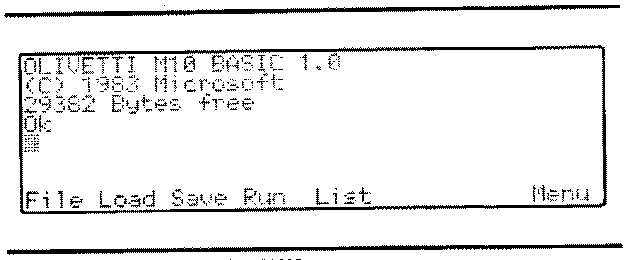
4. THE BASIC FACILITY The BASIC facility is one of five built-in application programs with which the M10 comes equipped. Most of the information required to exploit this facility to the full is contained in Part 2 of this manual - the BASIC Language Reference Guide. For all questions relating to the programming, syntax and structure of BASIC, the user should refer to this Reference Guide which also contains a comprehensive list of all BASIC commands with notes on their function and application. However, since BASIC is the very heart of the M10, the present chapter outlines some of the main points for operational completeness. BASIC stands for "Beginners All-purpose Symbolic Instruction Code" and it is the high-level programming language of the M10. Using this facility it is possible to write, store and run your own programs, written in BASIC. THE SCREEN AND OPERATING MODES IN BASIC In order to select BASIC from the main menu, position the cursor over the name BASIC and press <ENTER>. The screen appears as shown in Figure 4-1. The cursor appears as a flashing rectangle immediately below the BASIC prompt, Ok . Alternatively, an existing BASIC program may be loaded and executed by placing the menu cursor over the BASIC file name and pressing <ENTER>.
 Fig. 4-1 Screen on Entering BASIC
M10 Operations Guide 4-1
There are three operating modes in BASIC: - Direct - Execute - Text or Edit There is no need for the user to select the first two operating modes; this is done automatically by the computer, according to the operation being carried out. DIRECT MODE This is the mode in force when the RASIC prompt Ok appears on the screen. Direct Mode is used to enter programs or immediate lines (see the expla- nation of the concept of lines below). When <ENTER> is pressed to run the program, the M10 passes to Execute Node, reverting to Direct when the operation is complete. EXECUTE MODE This mode is operative when the M10 is actually running a program or an immediate line is being executed. When the operation is complete, the computer returns to Direct mode and the Ok prompt returns to the screen. TEXT or EDIT MODE The command EDIT <ENTER> invokes this mode when the BASIC prompt Ok is on the screen. It is used in order to edit a program. When Text Mode is operative, the cursor movement keys function as described in Chapter 5. To quit Text mode, press <F8>. The concept of lines is the following: - A logical line is a line of commands or instructions, terminated by a carriage return (i.e. by pressing <ENTER>) and may be up to 255 char- acters long. - A physical line is a text line on the screen and can therefore not exceed 40 characters in length. - An immediate line is a command or series of commands which are exe- cuted by the computer immediately on pressing <ENTER> e.g. PRTNT TIME$ 4-2
FUNCTION KEYS IN BASIC The tables shown below summarise the use of the function keys, F1-F8 and PASTE, LABEL and PAUSE/BREAK when using the BASIC program.