This device complies with Part 15 of the FCC Rules. Operation is subject to the following two conditions: (1) this device may not cause harmful interference, and (2) this device must accept any interference received, including interference that may cause undesired operation. .
NOTE: This equipment has been tested and found to comply with the limits for a Class A digital device, pursuant to Part 15 of the FCC Rules. These limits are designed to provide reasonable protection against harmful interference when the equipment is operated in a commercial environment. This equipment generates, uses, and can radiate radio frequency energy and, if not installed and used in accordance with the instruction manual, may cause harmful interference to radio communications. Operation of this equipment in a residential area is likely to cause harmful interference in which case the user will be required to correct the interference at his own expense.
Trademark Acknowledgements
MS-DOS and GW-BASIC are registered trademarks of Microsoft Corporation.
Notice
All rights reserved. Reproduction of any part of this manual in any form
whatsoever without Epson's express written permission is forbidden.
The contents of this manual are subject to change without notice.
All efforts have been made to ensure the accuracy of this manual*. However, should any errors be detected, Epson would greatly appreciate being informed of them.
The above notwithstanding, Epson can assume no responsibility for any errors in this manual or their consequences.
Copyright © 1988 by SEIKO EPSON CORPORATION Nagano, Japan
The PX-16 is a 16-bit portable computer, which is very compact, and light weighted.
The modular structure is one of the major features of the PX-16. Users can build up their own PX-16 system by adding option units to the PX-16 Base unit according to their needs. Therefore, the PX-16 Base unit is the core of the PX-16 system.
This document describes how to setting up the PX-16 Base unit. In addition to this document, the PX-16 Base unit package should contain the following items:
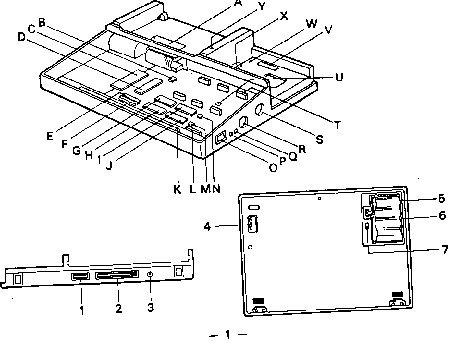
| A | Cartridge 2 I/F | K | Sub battery | U | Jumper 7 (J7) |
| B | ROM 1 switch (SW8) Expansion I/F | L | Connector 11 (CN11) | V | DIP switch (SW5) |
| C | Main CPU | M | ROM 2 switch (SW7) | W | System reset switch |
| D | (8087 option) | N | ROM 3 switch (SW6) | X | Cartridge 1 I/F |
| E | Connector 9 (CN9) | O | Power switch | Y | Power indicator |
| F | Connector 10 (CN10) | P | Reset switch | 1 | Printer I/F |
| G | ROM 1 | Q | System clock select switch | 2 | System bus |
| H | ROM 0 (SYSTEM ROM) | R | Barcode reader I/F | 3 | AC adapter jack |
| I | ROM 3 | S | RS0232 C I/F | 4 | Cartridge 1 lock switch |
| J | ROM 2 | T | RAM board connectors | 5 | Main battery |
| 6 | Battery box | ||||
| 7 | Back-up switch | ||||
Before setting up the PX-16 system, note the following points:
WARNING
To install option units, please refer to the "OPERATING INSTRUCTIONS" of each unit.
When you set up the PX-16 for the first time, you must install the main battery to the PX-16 Base unit. (After you installed the RAM board, the Standard keyboard or the Touch keyboard.) Procedure is as follows:

The PX-16 equips several switches with special functions. By set-ting these switches, the PX-16 can be expanded to various systems.
To turn on the PX 16, press the power switch at the right side. To turn it off, press it once again.
Jumper 7 is used to adjust the buzzer volume.
| Setting | Volume level |
| a | Low |
| b | High |
The default J7 setting is "a" (Low).
There is one set of ten DIPswitches, which is located beside the cartridge 1 interface. The DIPswitch controls the various configu-rations. Turn off the PX-16 before changing the DIPswitch. The func-tion of these switches is: . The DIP switch settings when the PX-16 is shipped are as follows:
| 1 | 2 | 3 | 4 | 5 | 6 | 7 | 8 | 9 | 10 |
| OFF | OFF | OFF | OFF | ON | OFF | OFF | OFF | OFF | OFF |
Keyboard setting.
Display..............
FDD
Boot type.
ASCII
Color monitor, LCD80 (80 x 25) or
LCD40
2 drives
Disk Unit 720 KB (2DD)
HC boot without FDD/HDD
| 1 | 2 | 3 | 4 | 5 | 6 | 7 | 8 | 9 | 10 | MEANING | |
| country |
OFF | OFF | OFF | OFF | ASCII | ||||||
| ON | OFF | OFF | OFF | UK | |||||||
| OFF | ON | OFF | OFF | FRANCE | |||||||
| ON | ON | OFF | OFF | GERMANY | |||||||
| OFF | OFF | ON | OFF | ITALY | |||||||
| ON | OFF | ON | OFF | SPAIN | |||||||
| OFF | ON | ON | OFF | DENMARK | |||||||
| ON | ON | ON | OFF | FINLAND | |||||||
| OFF | OFF | OFF | ON | NORWAY | |||||||
| ON | OFF | OFF | ON | SWEDEN | |||||||
| OFF | ON | OFF | ON | SWISS (FRENCH) | |||||||
| ON | ON | OFF | ON | SWISS (GERMAN) | |||||||
| OFF | OFF | ON | ON | (Reserved) | |||||||
| ON | OFF | ON | ON | (Reserved) | |||||||
| OFF | ON | ON | ON | JAPANESE | |||||||
| ON | ON | ON | ON | JAPANESE | |||||||
| display |
OFF | OFF | MONOCHROME CRT, LCD40 | ||||||||
| ON | OFF | COLOR CRT, LCD80 (80x25) LCD40 | |||||||||
| OFF | ON | COLOR CRT, LCD80 (40x25) LCD40 | |||||||||
| ON | ON | NO DISPLAY | |||||||||
| fdd |
OFF | FDD 2 DRIVES | |||||||||
| ON | FDD 1 DRIVE | ||||||||||
| OFF | 720 KB (3.5 inch, 2DD) | ||||||||||
| ON | 1.2 MB (3.5 inch, 2HD) | ||||||||||
| BOOT TYPE |
OFF | OFF | HC BOOT, WITHOUT FDD/HDD | ||||||||
| ON | OFF | HC BOOT, WITH FDD/HDD RAM PREFERENCE | |||||||||
| OFF | ON | HC BOOT, WITH FDD/HDD FDD PREFERENCE | |||||||||
| ON | ON | PC BOOT |
(*1) If you set the boot type to "PC boot", DIP switch settings 1 - 6 are ignored
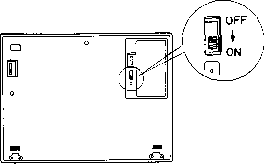
The back up switch in the battery box turns ON and OFF the sub-battery. Keep it turning on when the PX-16 is in operation. Turn it off during storage or when the PX-16 will not be used for a long time. The setting when the PX-16 is shipped from the factory is OFF. Please turn it on before use.
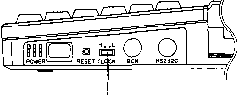
When the reset switch is pressed, the system will be initialized. All devices are reset except the slave CPU. The contents of the RAM disk will be kept.
When this switch is pressed, the system will be initialized. The system reset switch has the following different points to the reset switch.
This switch changes the CPU clock speed. The CPU clock speed is either 4.77 MHz or 10 MHz. Before changing the clock speed, please turn off the PX-16 Base unit. The default setting is 10 MHz.
System clock select switch
H: 10 MHz (default setting) L: 4.77 MHz
The ROM switches located on the motherboard of the PX-16 Base unit
select the type of application ROM. When an application ROM is installed
to the ROM socket, the ROM switches must be adjusted according to the ROM
type. There are 3 pairs of ROM switches.
ROM 1 switch (SW8) ROM 2 switch (SW7) ROM 3 switch (SW6)
Selects the type of ROM 1 Selects the type of ROM 2 Selects the type of
ROM 3
| 1 | 2 | Usable ROM |
| ON | OFF | 27C256 or 256Kbit CMOS mask ROM |
| ON | ON | 27C512 or 512Kbit CMOS mask ROM |
| X | ON | 27C1001 |
| OFF | ON | 2M, 4M bit CMOS mask ROM |
The default setting is 1:OFF, 2:ON.
X means that the setting of that DIPswitch has no affect in that situation.
There are 2 different ways to boot up the PX-16. They are:
PC boot
HC boot
There are 3 ways to boot up the PX-16 in HC boot. They are:
HC boot without FDD
HC boot with FDD, RAM preference
HC boot with FDD, FDD preference
By switching the DIP switch 9 and 10, boot type can be changed.
When the PX-16 is turned on in HC boot, the PX-16 DOS in the SYSTEM ROM will be executed. To use the unique functions with the PX-16, boot up the PX-16 in HC boot. There are 3 modes for the HC boot.
When the TF-16 or the Disk unit is not connected or you do not use them, boot up the PX-16 in this mode. The allocation of the drives are:
Drive A..................... RAM Disk
Drive B ..................... ROM 0 (SYSTEM ROM)
Drive C ..................... ROM 1
Drive D..................... ROM 2
Drive E ..................... ROM 3
Drive F ..................... Cartridge 1
Drive G
to ................... Expansion device
Drive Z
Same devices as the above are allocated from Drive A to F.
Drive G..................... FDD Drive 1
Drive H..................... FDD Drive 2
Drive I ...................... HDD
Drive J
to ..................... Expansion device
Drive Z
If the HDD (Disk Unit Type 3) is not connected, drive J advances to drive I. If you connect the Disk unit Type 1 (1 FDD) or Type 3 (1 FDD and 1 HDD ), set the DIP switch 7 to ON. Single Drive can be used as drive G and H.
The difference between the RAM preference and the FDD preference is the drive allocation. For the FDD preference, the drive names are allocated from the FDD. The allocation of the drives are as follows:
Drive A ..................... FDD Drive 1
Drive B ..................... FDD Drive 2
Drive C ..................... HDD
Drive D ..................... RAM Disk
Drive E ..................... ROM 0 (SYSTEM ROM)
Drive F ..................... ROM1
Drive G ..................... ROM2
Drive H ..................... ROM3
Drive I ..................... Cartridge 1
Drive J ..................... Expansion device
to Drive Z
If the HDD (Disk Unit Type 3) is not connected, drive D advances to drive C. If you connect the Disk unit Type 1 (1 FDD) or Type 3 (1 FDD and 1 HDD), set the DIP switch 7 to ON. Single Drive can be used as drive A and B.
When the PX-16 is turned on in PC boot, the PX-16 DOS in the SYSTEM ROM is not used. Instead of that, the PX-16 is turned on using the DOS in the floppy disk (TF-16 or Disk unit).
When the PX-16 is turned on in PC boot, special functions unique to the PX-16 are unavailable. Drives are allocated as follows:
A drive B drive. C drive
FDD Drive 1 FDD Drive 2 HDD
NOTE: When the PX-16 is turned on in PC boot without connecting the FDD, following error message is displayed.
601 -Diskette error F1 key to resume
When this message is displayed, connect the FDD, insert the system disk in it and press the F1 key.
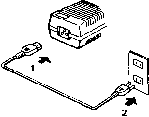
The PX-16 can be operated with the NiCd battery or with the AC adapter. When the AC adapter is connected to the PX-16 Base unit, power is supplied from the AC adapter and the main battery is charged. When the AC adapter is disconnected, power is supplied from the main battery.
If the voltage of the main battery drops below a certain level when the AC adapter is disconnected, the power indicator flickers. If this happens, connect the AC adapter. The duration to recharge the main battery fully is about 15 hours whether the power of the PX-16 Base unit is ON or OFF.
Procedure to recharge the battery is as follows:
WARNING
When the voltage of the battery drops below a certain level approximately 4.75V, the power indicator will flicker. When this happens, connect the AC adapter to the PX-16 Base unit.
The procedure to follow after low voltage is detected is different according to the boot type.
2 minutes after low voltage is detected, the PX-16 is turned off auto- matically. (The period to turn off the PX-16 after low battery is detected can be changed by software.)
When the PX-16 is turned on once again, the PX-16 starts in resume start, which means that the execution continues from the point at which it was interrupted.
4 minutes after low voltage is detected, the PX-16 is turned off auto- matically.
When the PX-16 is turned on once again, the PX-16 always executes warm boot. When warm boot is executed, the system boots up again.
| CPU | Main CPU | V20 (4.77/10MHz Selectable) |
| Slave CPU | µPD78106 | |
| RAM | Main RAM | 256KB (Standard), 640KB (MAX.) |
| Expansion RAM Disk | 0 KB (Standard), 768 KB (MAX.) | |
| ROM | System ROM | MS-DOS Ver 3.2, GW BASIC, Utilities |
| Application ROM | Zero Insertion Force socket x 3 CMOS EPROM: 256Kbit, 512Kbit or 1Mbit CMOS MASK ROM: 256Kbit, 512Kbit, 2Mbit or 4Mbit |
|
| I/F | Interface | Cartridge 1 Cartridge 2 Expansion Interface System Bus Printer Interface RS-232C Interface Barcode Reader Interface |
| Size | Width | 315 mm |
| Depth | 224 mm | |
| Height | 47 mm | |
| Weight | Base unit + Standard keyboard + LCD40: Approx. 2.1 kg Base unit + Standard keyboard + LCD80: Approx. 2.9 kg |
|
| Environment | Temperature | Operating 5°-35°C (40°-95°F) Data Integrity 5°-35°C (40°-95°F) Storage -20°--50°C (-5°--122°F) |
| Humidity | Operating 10-80% (Non-condensing) Storage 10-80% (Non-condensing) |
|
| Vibration | Frequency 5-150 Hz Acceleration 1-?G |
Note: Specifications are subject to change without notice.